🚀DevOps Zero to Hero- 💡Day 3: Continuous Integration (CI)📌
 Welcome to Day 3 of our 30-day DevOps course! Today, we’re going to talk about Continuous Integration (CI) and its important role in modern software development. CI is a way to make software building, testing, and deployment faster and more reliable. We’ll explain what CI is, show you how to set up a CI pipeline using tools like Jenkins or GitLab CI/CD, and provide easy-to-follow examples.
What is Continuous Integration (CI)?
Continuous Integration is a way of working in software development. It means that as different programmers write code for a project, their changes are regularly combined, or integrated, into the project. This process helps find problems and bugs early, making the software more reliable. The goal of CI is to make sure the software is always ready for release, no matter how many people are working on it.
Why CI is Important in DevOps:
CI is a crucial part of DevOps. It brings some great benefits:
1. Working Together: It helps developers work together better.
2. Finding Bugs Early: It catches problems before they become big issues.
3. Quick Feedback: It gives fast feedback on whether the software is working correctly.
4. Automation: It automatically builds, tests, and even deploys the software.
Let’s See How CI Works:
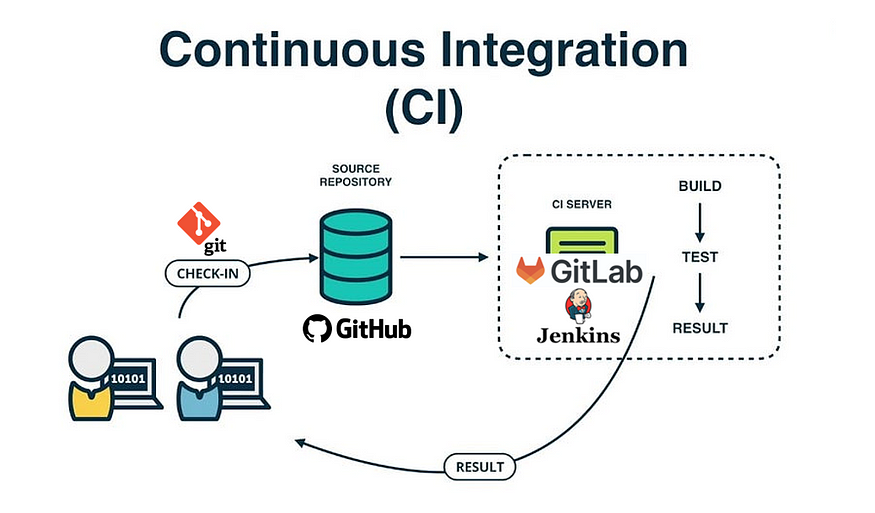
Imagine a project where a team is creating a mobile shopping app. Here’s how CI can help:
Step 1: Keeping Things Organized — VCS & Repository setup
The team uses a tool like Git to keep track of all the code changes. Each developer clones the repository and works on their respective features or bug fixes in their local branches. Everyone works on their part of the app in their own area, or branch.
Step 2: CI Pipeline Setup
For CI, the team uses tools like Jenkins or GitLab CI/CD. They create a pipeline with different steps:
a) Building: The CI pipeline triggers an automated build process whenever a developer pushes their changes to the repository. The pipeline builds the app when a developer adds their changes. It turns the code into a working app.
b) Testing: After building, the pipeline runs tests to make sure the app works properly. This includes unit tests, integration tests, and possibly UI tests to ensure the app behaves as expected.
c) Deployment: If the build and tests pass successfully, the CI pipeline can proceed to the deployment stage. Here, the app can be deployed to a test environment, such as a staging server or an emulator/simulator for mobile platforms. This allows the team to verify the app’s behavior in a realistic environment.
Step 3: Developers Keep Working
Developers keep making changes and adding them to the code. The CI tools keep checking the changes automatically.
Step 4: Getting Feedback
The CI pipeline quickly shows if something’s wrong with the code. If there are issues, the developers are told right away. They can then work together to fix them.
Step 5: Bringing It All Together
When everything works well, the changes are combined into the main part of the app. This triggers the CI pipeline again to make sure everything still works after combining the changes.
How to Set Up CI with Jenkins:
Here’s a simple guide to set up CI using Jenkins:
1. Install Jenkins on your server.
2. Create a new job in Jenkins and connect it to your code repository (like Git).
3. Tell Jenkins how to build, test, and deploy your app.
4. Set it up so that Jenkins runs the pipeline whenever there are changes in the code.
Example Jenkinsfile (Pipeline Script):
Here’s a basic script you can use in Jenkins:
pipeline {
  agent any

  stages {
    stage('Build') {
      steps {
        sh 'mvn clean compile'
      }
    }

    stage('Test') {
      steps {
        sh 'mvn test'
      }
    }

    stage('Deploy') {
      steps {
        sh 'mvn deploy'
      }
    }
  }
}
CI with GitLab:
For GitLab, follow these steps:
1. Create a GitLab repository for your project.
2. Make a .gitlab-ci.yml file in your repository.
3. Write the stages and jobs for the pipeline in this file.
Example .gitlab-ci.yml:
stages:
  - build
  - test
  - deploy

build:
  stage: build
  script:
    - mvn clean compile

test:
  stage: test
  script:
    - mvn test

deploy:
  stage: deploy
  script:
    - mvn deploy
Benefits of Automating CI:
✅ Saves Time: Automating tasks makes things faster.
✅ Consistency: It keeps things the same every time.
✅ Finding Issues Early: It helps find problems sooner.
✅ Teamwork: It encourages teamwork among developers.
✅ Faster Software: It helps get new features out quicker.
Conclusion:
In this blog, we explored Continuous Integration (CI) and how it’s super useful in DevOps. We learned about setting up a CI pipeline with Jenkins and GitLab CI/CD, and saw how automating tasks can make software development better. With this knowledge, you can start using CI in your own projects. Stay tuned for Day 4, where we’ll dive into Configuration Management!


No comments:
Post a Comment
Note: Only a member of this blog may post a comment.