How to keep X11 display after su or sudo - MobaXterm
 I have received a lot of emails asking how to keep X11-forwarding working after changing user to root inside a SSH session in MobaXterm. This is by default not allowed on Unix/Linux systems, because the X11 display connection belongs to the user you used to log with when connecting to your remote SSH server. X11-forwarding mechanism does not allow anyone to use the open display.
However, in some cases you may need to start a graphical application like nedit or firefox in a sudo or su context. In order to achieve this, you could manually retrieve X credentials in the su/sudo context by looking up the “xauth list” for the original username and then adding them using “xauth add” to the current context.
You can also use a single (magic) command in order to achieve this!
For instance, here is a simple scenario:
- I start a SSH session to remote server “Server1” with user “john”
- In this session, I perform a “su -” command in order to become “root”
- If I run “xclock”, the following error occurs:
MobaXterm X11 proxy: Authorisation not recognised
Error: Can’t open display: localhost:10.0
Error: Can’t open display: localhost:10.0
I just have to execute the following command in order to retrieve my display and make “xclock” work:
xauth add $(xauth -f ~john/.Xauthority list|tail -1)
We hope this will help you if you need to have a working X11 display through SSH after becoming root.xauth add $(xauth -f ~john/.Xauthority list|tail -1)
Install and configure Squid proxy server on Linux
 A proxy server is a computer that acts as an intermediary between a desktop computer and the internet and allows a client machine to make an indirect connection to network servers and services. There are many reasons why you might want to include a proxy server on your network:
- To share internet connection on a LAN
- To speed up internet surfing
- To hide the IP address of the client computer for anonymous surfing
- To implement internet access control
- To scan outbound content
- To circumvent regional restrictions
1. Install Squid
Squid can be easily install using yum command line tool.
2. Setup Port and Start Service
Squid by default run on port 3128. If you want to start squid on different port, Edit squid configuration file and change http_port value. For example we are changing squid to run on port 8080.
Start/Restart Squid service.
3. Configure SQUID to Block Specific Website
Add below rules to block specific website before any allow all rules. Below example will block yahoo.com and www.rediff.com.
If you have a long list of domain names, Create a file /etc/squid/blockwebsites.lst and put domain names one per line and add below rule in squid configuration file.
blockwebsites.lst file content example:
4. Configure Squid to Block Specific Keyword
Add below rules to block specific website before any allow all rules. Below example will block all pages having keyword yahoo or gmail.
If you have a long list of keywords, Create a file /etc/squid/blockkeywords.lst and put keywords one per line and add below rule in squid configuration file.
blockkeywords.lst file content example:
Congratulation’s you have successfully installed and configured Squid proxy server
Finding WWN number of HBA and Scanning FC luns in linux
So How to find WWN number of HBA and scan the FC Luns in LINUX without rebooting the server?
Here is a solution to find WWN number of HBA and scan the FC Luns.
Identify the number of HBA adapters
systool -c fc_host -vNote the number of hosts available in the server. We have Two HBA here from the above example (host0 and host1).
or
ls /sys/class/fc_host
host0 host1
To get the WWNN (World Wide Node Number) of HBA or FC card in Linux
cat /sys/class/fc_host/host0/node_name
0x20000000c9538d83
cat /sys/class/fc_host/host1/node_name
0x20000000c9538dac
To get the WWPN (World Wide Port Number) of HBA or FC card in Linux
cat /sys/class/fc_host/host0/port_name0x10000000c9538d83
cat /sys/class/fc_host/host1/port_name0x10000000c9538dac
If you have more HBAs, replace "host0 or host1" with "hostN ". In most cases, System admins need to provide the WWPN to storage admins for the storage allocation.
Scan the newly added or rescan the existing LUNs in Linux
echo "1" > /sys/class/fc_host/host0/issue_lip
echo "- - -" > /sys/class/scsi_host/host0/scan
If you have more number of hosts file under the directory /sys/class/fc_host, then use the command for each hosts file by replacing the "host0".
From Redhat Linux 5.4 onwards, redhat introduced “/usr/bin/rescan-scsi-bus.sh” script to scan all the SCSI bus and update the SCSI layer to reflect new devices.
We can also use the "rescan-scsi-bus.sh" script to detect new LUNs without rebooting the server.
This script is available with sg3-utils package. So install the sg3-utils package using yum.
yum install sg3_utils
rescan-scsi-bus.sh
Now check the detected disks using fdisk command.
6 Strategies for Migrating Applications to the Cloud
Formulating a Migration Strategy
Enterprises typically begin to contemplate how to migrate an application during the second phase of the “Migration Process” — Portfolio Discovery and Planning. This is when they determine what’s in their environment, what are the interdependencies, what’s going to be easy to migrate and what’s going to be hard to migrate, and how they’ll migrate each application.
Using this knowledge, organizations can outline a plan (which should be considered subject to change as they progress through their migration and learn) on how they’ll approach migrating each of the applications in their portfolio and in what order.
The complexity of migrating existing applications varies, depending on the architecture and existing licensing arrangements. If I think about the universe of applications to migrate on a spectrum of complexity, I’d put a virtualized, service-oriented architecture on the low-complexity end of the spectrum, and a monolithic mainframe at the high-complexity end of the spectrum.
I suggest starting with something on the low-complexity end of the spectrum for the obvious reason that it will be easier to complete — which will give you some immediate positive reinforcement or “quick wins” as you learn.
6 Application Migration Strategies: “The 6 R’s”
The 6 most common application migration strategies we see are: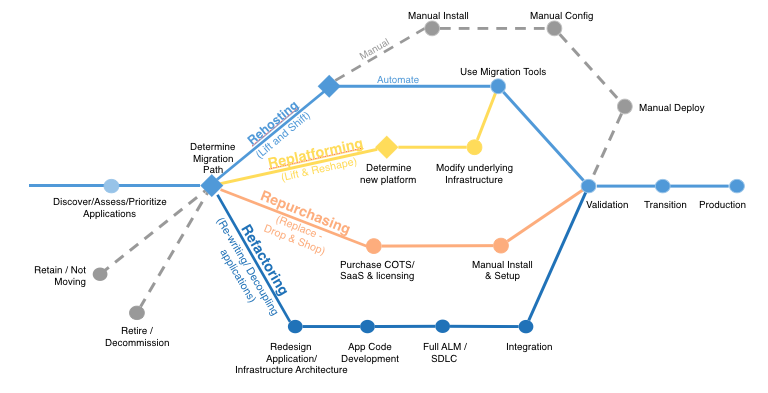
1. Rehosting — Otherwise known as “lift-and-shift.”
We find that many early cloud projects gravitate toward net new development using cloud-native capabilities, but in a large legacy migration scenario where the organization is looking to scale its migration quickly to meet a business case, we find that the majority of applications are rehosted. GE Oil & Gas, for instance, found that, even without implementing any cloud optimizations, it could save roughly 30 percent of its costs by rehosting.
Most rehosting can be automated with tools (e.g. AWS VM Import/Export, Racemi), although some customers prefer to do this manually as they learn how to apply their legacy systems to the new cloud platform.
We’ve also found that applications are easier to optimize/re-architect once they’re already running in the cloud. Partly because your organization will have developed better skills to do so, and partly because the hard part — migrating the application, data, and traffic — has already been done.
2. Replatforming — I sometimes call this “lift-tinker-and-shift.”
Here you might make a few cloud (or other) optimizations in order to achieve some tangible benefit, but you aren’t otherwise changing the core architecture of the application. You may be looking to reduce the amount of time you spend managing database instances by migrating to a database-as-a-service platform like Amazon Relational Database Service (Amazon RDS), or migrating your application to a fully managed platform like Amazon Elastic Beanstalk.
A large media company we work with migrated hundreds of web servers it ran on-premises to AWS, and, in the process, it moved from WebLogic (a Java application container that requires an expensive license) to Apache Tomcat, an open-source equivalent. This media company saved millions in licensing costs on top of the savings and agility it gained by migrating to AWS.
3. Repurchasing — Moving to a different product.
I most commonly see repurchasing as a move to a SaaS platform. Moving a CRM to Salesforce.com, an HR system to Workday, a CMS to Drupal, and so on.4. Refactoring / Re-architecting — Re-imagining how the application is architected and developed, typically using cloud-native features.
This is typically driven by a strong business need to add features, scale, or performance that would otherwise be difficult to achieve in the application’s existing environment.Are you looking to migrate from a monolithic architecture to a service-oriented (or server-less) architecture to boost agility or improve business continuity (I’ve heard stories of mainframe fan belts being ordered on e-bay)? This pattern tends to be the most expensive, but, if you have a good product-market fit, it can also be the most beneficial.
5. Retire — Get rid of.
Once you’ve discovered everything in your environment, you might ask each functional area who owns each application. We’ve found that as much as 10% (I’ve seen 20%) of an enterprise IT portfolio is no longer useful, and can simply be turned off. These savings can boost the business case, direct your team’s scarce attention to the things that people use, and lessen the surface area you have to secure.6. Retain — Usually this means “revisit” or do nothing (for now).
Maybe you’re still riding out some depreciation, aren’t ready to prioritize an application that was recently upgraded, or are otherwise not inclined to migrate some applications. You should only migrate what makes sense for the business; and, as the gravity of your portfolio changes from on-premises to the cloud, you’ll probably have fewer reasons to retain.Linux booting issues and solutions
Here I am going to see how to resolve few of the common booting issues in Linux.
Option 1: init not found error
Option 2: Run fsck on all FS in rescue mode
Option 3: Reinstall GRUB
Option 4: Recover grub.conf / grub configuration
Error : "init not found" displayed
1) Launch the system to Bash shell prompt
Reboot the server and interrupt to edit the GRUB.
Edit grub and enter the below in last
init=/bin/bash
Then save and exit and boot the server. This will launch you straight into a Bash shell prompt.Then you can remount “/” file system and check /var/log/messages for any error.
Note : init=/bin/bash (Grub boot loader) or linux init=/bin/bash (if Lilo boot loader).
2) Once server booted and if it is in Bash shell prompt
#mount -o remount,rw /
3) Now you can check the log messages and try to find the reason for server pacnic or error.
#more /var/log/messages
1) Boot from the Linux First CD (boot CD).
2) Type “boot rescue” at Linux boot prompt.
3) After the bash shell prompt show up, type the below command
# chroot /mnt/sysimage
a) Run fsck and Check for any disk error
#fdisk -l /dev/sda //check how many partion you have
then run fsck on each partition
#fsck -y /dev/sda2'
In rescue mode.
# chroot /mnt/sysimage
# /sbin/grub-install /dev/hda
(possibly caused by incorrect changes to the the GRUB configuration file, installation of another OS, changes to device ordering due to hardware or BIOS changes, etc.)
# grub> find /boot/grub/grub.conf (or) grub>find /grub/grub.conf (or) find /boot/grub/stage1
(hd0,1)
(hd1,2)
>> This tells us that we have two /boot partitions. Then we have to reinstall the GRUB config on disk (one by one) and try.
#grub> root (hd0,1) //Write the GRUB boot loader on the MBR of the first disk
grub> setup (hd0)
grub>quit
If you have doubt as to where the root partition is located then try to find a file in /etc.
#grub> find /etc/fstab
(hd0,1)
Note: You must pay attention to your devices, for me "hd0" is the root disk and (hd0,1) is /boot partition , and (hd0,1) is my ROOT (/) partition. mostly / "root" partion will be on LVM.
You might not even have "hd0" mapped out. Review your "/boot/grub/device.map" file
#cat /boot/grub/device.map
Option 1: init not found error
Option 2: Run fsck on all FS in rescue mode
Option 3: Reinstall GRUB
Option 4: Recover grub.conf / grub configuration
Option 1: For normal panic and "init not found" error.
Error : "init not found" displayed
1) Launch the system to Bash shell prompt
Reboot the server and interrupt to edit the GRUB.
Edit grub and enter the below in last
init=/bin/bash
Then save and exit and boot the server. This will launch you straight into a Bash shell prompt.Then you can remount “/” file system and check /var/log/messages for any error.
Note : init=/bin/bash (Grub boot loader) or linux init=/bin/bash (if Lilo boot loader).
2) Once server booted and if it is in Bash shell prompt
#mount -o remount,rw /
3) Now you can check the log messages and try to find the reason for server pacnic or error.
#more /var/log/messages
Option 2: If the above option not helped then follow the next
1) Boot from the Linux First CD (boot CD).
2) Type “boot rescue” at Linux boot prompt.
3) After the bash shell prompt show up, type the below command
# chroot /mnt/sysimage
a) Run fsck and Check for any disk error
#fdisk -l /dev/sda //check how many partion you have
then run fsck on each partition
#fsck -y /dev/sda2'
Option 3: If the above also not helped then try to reinstall grub and retry.
In rescue mode.
# chroot /mnt/sysimage
# /sbin/grub-install /dev/hda
Option 4: If a system has issues with the GRUB configuration
(possibly caused by incorrect changes to the the GRUB configuration file, installation of another OS, changes to device ordering due to hardware or BIOS changes, etc.)
# grub> find /boot/grub/grub.conf (or) grub>find /grub/grub.conf (or) find /boot/grub/stage1
(hd0,1)
(hd1,2)
>> This tells us that we have two /boot partitions. Then we have to reinstall the GRUB config on disk (one by one) and try.
#grub> root (hd0,1) //Write the GRUB boot loader on the MBR of the first disk
grub> setup (hd0)
grub>quit
If you have doubt as to where the root partition is located then try to find a file in /etc.
#grub> find /etc/fstab
(hd0,1)
Note: You must pay attention to your devices, for me "hd0" is the root disk and (hd0,1) is /boot partition , and (hd0,1) is my ROOT (/) partition. mostly / "root" partion will be on LVM.
You might not even have "hd0" mapped out. Review your "/boot/grub/device.map" file
#cat /boot/grub/device.map
Difference between RHEL6 and RHEL7
Below are the major differences between RHEL 6 and 7.
On the release date for 6 & 7
RHEL 6: 10 NOV 2010
RHEL 7: 10 JUNE 2014
The latest is RHEL 7
Difference on the basis of operating system names
if we want to see use this command
# cat /etc/redhat-release
RHEL 6: SANTIGO
RHEL 7: MAIPO
Kernel version
If we want to see in terminal use this command: lsb_release -a or uname -a
RHEL 6: 2.6.32
RHEL 7: 3.0.10
OS boot time
RHEL 6: 40 sec
RHEL 7: 20 sec
Maximum size of single partition
RHEL 6: 50TB(EXT4)
RHEL 7: 500TB(XFS)
Boot loader
RHEL 6: /boot/grub/grub.conf
RHEL 7: /boot/grupb2/grub.cfg
Processor architecture
RHEL 6: It support 32bit & 64bit both
RHEL 7: It only support 64bit
How to format or assign a file system in
RHEL 6: # mkfs.ext4 /dev/hda6
RHEL 7: # mkfs.xfs /dev/hda6
How to repair a file system in
RHEL 6: # fsck -y /dev/hda6
RHEL 7: # xfs_repair /dev/hda6
Command to manage network
RHEL 6: # setup
RHEL 7: # nmtui
Host name configuration file
RHEL 6: /etc/sysconfig/network
RHEL 7: /etc/hostname
Default ISO image mount path
RHEL 6: /media
RHEL 7: /run/media/root
File system check
RHEL 6: e2fsck
RHEL 7: xfs_repair
Resize a filesystem
RHEL 6: # resize2fs -p /dev/vg00/lv1
RHEL 7: # xfs_growfs /dev/vg00/lv1
Tune a filesystem
RHEL 6: tune2fs
RHEL 7: xfs_admin
IP tables and firewalls
RHEL 6: iptables
RHEL 7: firewalled
Communication between TCP and UDP in backend
RHEL 6: netcat
RHEL 7: ncat
Interface name
RHEL 6: eth0
RHEL 7: ens198(N)
Combining NIC
RHEL 6: Network Bonding
RHEL 7: Team Driver
NFS server version
RHEL 6: NFSv2
RHEL 7: NFSV4
Database used
RHEL 6: Mysql
RHEL 7: mariaDB
Managing services
RHEL 6:
# service sshd restart
# chkconfig sshd on
RHEL 7:
# systemctl restart sshd
# systemctl enable shhd
Ethernet Bonding in linux
NICteaming/bonding is used mostly in scenarios where you cannot afford to loose connectivity due to ethernet failover issues and also it has many other advantages like to distribute bandwidth, fault tolerance etc
Edit the configuration files of both the Ethernet cards with the options as shown below
Create a new file inside /etc/sysconfig/network-scripts/ifcfg-bond0 with the parameters as shown below
In RED HAT 6
Here, you can use different values for mode and miimon
Here are the list of available options
balance-rr or 0 : Sets a round-robin policy for fault tolerance and load balancing. Transmissions are received and sent out sequentially on each bonded slave interface beginning with the first one available.
active-backup or 1: Sets an active-backup policy for fault tolerance. Transmissions are received and sent out via the first available bonded slave interface. Another bonded slave interface is only used if the active bonded slave interface fails.
balance-xor or 2: Sets an XOR(exclusive-or) policy for fault tolerance and load balancing. Using this method the interface matches up the incoming request's MAC Address with the MAC Address for one of the slave NICs. Once the link is established, transmissions are sent out sequentially beginning with the first available interface.
broadcast or 3: Sets a broadcast policy for fault tolerance. All transmissions are sent on all slave interfaces.
802.3ad or 4: Sets an IEEE802.3ad dynamic link aggregation policy. Creates aggregation groups that share the same speed and duplex settings. Transmits and receives on all slave in the active aggregator. Requires a switch that is 802.3ad compliant
balance-tlb or 5: Sets a Transmit Load Balancing (TLB) policy for fault tolerance and load balancing. The outgoing traffic is distributed according to the current load on each slave interface. Incoming traffic is received by the current slave. If the receiving slave fails, another slave takes over the MAC address of the failed slave.
balance-alb or 6: Sets and Active Load balancing (ALB) policy for fault tolerance and load balancing. Includes transmit and receive and load balancing for IPV4 traffic. Receive load balancing is achieved thorugh ARP negotiation
So for our demo purpose we will use mode 1 make NIC bonding for Fault Tolerance
Now time to load the bonding module
Restart the network interface to make the changes affect
Verify if your configuration has worked properly using below command
Check your network status
This post should help you with ethernet bonding in linux
Let us begin with the configuration:
Make sure you have two(at least) physical Ethernet cards in your Linux machine.Edit the configuration files of both the Ethernet cards with the options as shown below
# less /etc/sysconfig/network-scripts/ifcfg-eth0
DEVICE=eth0
MASTER=bond0
USERCTL=no
SLAVE=yes
BOOTPROTO=none
TYPE=Ethernet
ONBOOT=yes
# less /etc/sysconfig/network-scripts/ifcfg-eth1
DEVICE=eth1
TYPE=Ethernet
ONBOOT=yes
BOOTPROTO=none
MASTER=bond0
SLAVE=yes
USERCTL=noCreate a new file inside /etc/sysconfig/network-scripts/ifcfg-bond0 with the parameters as shown below
# less /etc/sysconfig/network-scripts/ifcfg-bond0
DEVICE=bond0
IPADDR=192.168.0.100
GATEWAY=192.168.0.1
NETMASK=255.255.255.0
USERCTL=no
BOOTPROTO=none
ONBOOT=yes
PEERDNS=yes
In RED HAT 5
Append/make these following changes in below mentioned file as shown# vi /etc/modprobe.conf
alias bond0 bonding
options bond0 mode=1 miimon=100In RED HAT 6
You will not find modprobe.conf file so you need to define bonding option inside your ifcfg-bond0configuration file as shown below
# less /etc/sysconfig/network-scripts/ifcfg-bond0
DEVICE=bond0
IPADDR=192.168.0.100
GATEWAY=192.168.0.1
NETMASK=255.255.255.0
DNS1=8.8.8.8
BONDING_OPTS="miimon=100 mode=1"
USERCTL=no
PEERDNS=yes
BOOTPROTO=none
ONBOOT=yesDifferent types of modes available for NIC bonding:
You can configure NIC Teaming for various purposes. So while configuration you will have to specify the purpose for which you want to utilize NIC Teaming.Here are the list of available options
balance-rr or 0 : Sets a round-
active-
balance-xor or 2: Sets an XOR(exclusive-or) policy for fault tolerance and load balancing. Using this method the interface matches up the incoming request's MAC Address with the MAC Address for one of the slave NICs. Once the link is established, transmissions are sent out sequentially beginning with the first available interface.
802.3ad or 4: Sets an IEEE802.3ad dynamic link aggregation policy. Creates aggregation groups that share the same speed and duplex settings. Transmits and receives on all slave in the active aggregator. Requires a switch that is 802.3ad compliant
balance-alb or 6: Sets and Active Load balancing (ALB) policy for fault tolerance and load balancing. Includes transmit and receive and load balancing for IPV4 traffic. Receive load balancing is achieved thorugh ARP negotiation
What is miimon in NICTeaming?
Specifies (in milliseconds) how often MII link monitoring occurs. This is useful if high availability is required because MII is used to verify that the NIC is active. To verify that the driver for a particular NIC supports the MII tool, type the following command as root:# ethtool <interface_name> | grep "Link detected:"# ethtool eth0 | grep "Link detected:"
Link detected: yes
# ethtool eth1 | grep "Link detected:"
Link detected: yesSo for our demo purpose we will use mode 1 make NIC bonding for Fault Tolerance
Now time to load the bonding module
# modprobe bonding# service network restart# cat /proc/net/bonding/bond0
Ethernet Channel Bonding Driver: v3.4.0-1 (October 7, 2008)
Bonding Mode: fault-tolerance (active-backup)
Primary Slave: None
Currently Active Slave: eth0
MII Status: up
MII Polling Interval (ms): 100
Up Delay (ms): 0
Down Delay (ms): 0
Slave Interface: eth0
MII Status: up
Speed: 1000 Mbps
Duplex: full
Link Failure Count: 0
Permanent HW addr: 5f:5g:56:3v:23:54
Slave Interface: eth1
MII Status: up
Speed: 1000 Mbps
Duplex: full
Link Failure Count: 0
Permanent HW addr: 4f:76:23:v4:76:f6# ifconfig
bond0 Link encap:Ethernet HWaddr R5:4G:45:6H:14:54
inet addr:192.168.0.100 Bcast:192.168.0.1 Mask:255.255.255.0
UP BROADCAST RUNNING MASTER MULTICAST MTU:1500 Metric:1
RX packets:675166546 errors :0 dropped :0 overruns:0 frame:0
TX packets:60123345 errors:0 dropped:0 overruns:0 carrier:0
collisions:0 txqueuelen:0
RX bytes:717558660669 (668.2 GiB) TX bytes:680121390699 (633.4 GiB)
eth0 Link encap:Ethernet HWaddr 5F:5G:56:3V:23:54
UP BROADCAST RUNNING SLAVE MULTICAST MTU:1500 Metric:1
RX packets:675130834 errors:0 dropped:0 overruns:0 frame:0
TX packets:601230970 errors:0 dropped:0 overruns:0 carrier:0
collisions:0 txqueuelen:1000
RX bytes:717553120481 (668.2 GiB) TX bytes:680121390699 (633.4 GiB)
Interrupt:169 Memory:96000000-96012800
eth1 Link encap:Ethernet HWaddr 4F:76:23:V4:76:F6
UP BROADCAST RUNNING SLAVE MULTICAST MTU:1500 Metric:1
RX packets:35302 errors:0 dropped:0 overruns:0 frame:0
TX packets:0 errors:0 dropped:0 overruns:0 carrier:0
collisions:0 txqueuelen:1000
RX bytes:5540188 (5.2 MiB) TX bytes:0 (0.0 b)
Interrupt:122 Memory:94000000-94012800This post should help you with ethernet bonding in linux
PowerPath Powermt Commands - EMC
Below are the 10 major commands to check the POWER PATH config on unix servers.
Please follow the below commands
1.powermt display ====>Display High Level HBA I/O Paths
2.powermt display dev=emcpowera ===>Display for specific LUN
3.powermt display dev=all ====> Display All Attached LUNs
4.powermt check_registration ===> Display PowerPath Registration Key / Status
5.powermt display options ===> Display EMC PowerPath Options
6.powermt display hba_mode ====> Display PowerPath HBA Mode
7.powermt display paths – Display available I/O Paths.
8.powermt displays port_mode ===>Display Port Status
9.powermt version ====> Display EMC PowerPath Version
10.powermt check ===>Check the I/O Paths
Example output:
Symmetrix logical device count=212
CLARiiON logical device count=0
Hitachi logical device count=0
Invista logical device count=0
HP xp logical device count=0
Ess logical device count=0
HP HSx logical device count=0
==============================================================================
----- Host Bus Adapters --------- ------ I/O Paths ----- ------ Stats ------
### HW Path Summary Total Dead IO/Sec Q-IOs Errors
==============================================================================
3 0/4/0/0/0/1 optimal 424 0 - 0 848
5 0/5/0/0/0/1 optimal 424 0 - 0 848
Pseudo name=disk915
Symmetrix ID=000290103691
Logical device ID=06B8
state=alive; policy=SymmOpt; priority=0; queued-IOs=0;
==============================================================================
--------------- Host --------------- - Stor - -- I/O Path -- -- Stats ---
### HW Path I/O Paths Interf. Mode State Q-IOs Errors
==============================================================================
3 0/4/0/0/0/1.0x5006048c52a862e7.0x40a6000000000000 c14t4d6 FA 8cB active alive 0 2
3 0/4/0/0/0/1.0x5006048c52a862f7.0x40a6000000000000 c15t4d6 FA 8dB active alive 0 2
5 0/5/0/0/0/1.0x5006048c52a862e8.0x40a6000000000000 c16t4d6 FA 9cB active alive 0 2
5 0/5/0/0/0/1.0x5006048c52a862f8.0x40a6000000000000 c17t4d6 FA 9dB active alive 0 2
Pseudo name=disk988
Symmetrix ID=000290103691
Logical device ID=074B
state=alive; policy=SymmOpt; priority=0; queued-IOs=0;
==============================================================================
--------------- Host --------------- - Stor - -- I/O Path -- -- Stats ---
### HW Path I/O Paths Interf. Mode State Q-IOs Errors
==============================================================================
5 0/5/0/0/0/1.0x5006048c52a862e8.0x40dc000000000000 c16t11d4 FA 9cB active alive 0 2
3 0/4/0/0/0/1.0x5006048c52a862e7.0x40dc000000000000 c14t11d4 FA 8cB active alive 0 2
3 0/4/0/0/0/1.0x5006048c52a862f7.0x40ce000000000000 c15t9d6 FA 8dB active alive 0 2
5 0/5/0/0/0/1.0x5006048c52a862f8.0x40ce000000000000 c17t9d6 FA 9dB active alive 0 2
Details:
a. Pseudo name=emcpowera – The device name that can be used by the server. For example,
/dev/emcpowera.
b. CLARiiON ID=AAA00000000000 [dev-server] - EMC CLARiiON CX3 serial number and
the server name.
c. Logical device ID=11111111 [LUN 1] – LUN number. For example, LUN 1.
d. state=alive; policy=CLAROpt; – This displays that this particular LUN is valid and using
the CLAROpt policy.
e. Owner: default=SP B, current=SP B – This indicates that the default (and current) owner for
this LUN is storage processor SP B.
If you’ve lost the PowerPath registration key that you’ve used during the EMC PowerPath installation, you can retrieve it using the following command.
# powermt check_registration
Key AAAA-BBBB-CCCC-DDDD-EEEE-FFFF
Product: PowerPath
Capabilities: All
Displays the high level EMC SAN array options.
This is similar to #1, but displays whether hba is enabled or not, as shown in the last column of the output.
Examble output:
Symmetrix logical device count=212
CLARiiON logical device count=0
Hitachi logical device count=0
Invista logical device count=0
HP xp logical device count=0
Ess logical device count=0
HP HSx logical device count=0
==============================================================================
----- Host Bus Adapters --------- ------ I/O Paths ----- Stats
### HW Path Summary Total Dead Q-IOs Mode
==============================================================================
3 0/4/0/0/0/1 optimal 424 0 0 Enabled
5 0/5/0/0/0/1 optimal 424 0 0 Enabled
This displays all available path for your SAN device.
Displays the status of the individual ports on the HBA. i.e Whether the port is enabled or not.
How to identify the version number of EMC PowerPath software?
If we made changes to the HBA’s, or I/O paths, then run the powermt check, to take appropriate action. For example,
if you manually removed an I/O path, check command will detect a dead path and remove it from the EMC path list.
Please follow the below commands
1.powermt display ====>Display High Level HBA I/O Paths
2.powermt display dev=emcpowera ===>Display for specific LUN
3.powermt display dev=all ====> Display All Attached LUNs
4.powermt check_registration ===> Display PowerPath Registration Key / Status
5.powermt display options ===> Display EMC PowerPath Options
6.powermt display hba_mode ====> Display PowerPath HBA Mode
7.powermt display paths – Display available I/O Paths.
8.powermt displays port_mode ===>Display Port Status
9.powermt version ====> Display EMC PowerPath Version
10.powermt check ===>Check the I/O Paths
1. #powermt display ===>Display High Level HBA I/O Paths
Example output:Symmetrix logical device count=212
CLARiiON logical device count=0
Hitachi logical device count=0
Invista logical device count=0
HP xp logical device count=0
Ess logical device count=0
HP HSx logical device count=0
==============================================================================
----- Host Bus Adapters --------- ------ I/O Paths ----- ------ Stats ------
### HW Path Summary Total Dead IO/Sec Q-IOs Errors
==============================================================================
3 0/4/0/0/0/1 optimal 424 0 - 0 848
5 0/5/0/0/0/1 optimal 424 0 - 0 848
2. #powermt display dev=emcpowera ===>Display specific LUN
When there are multiple LUNs connected to a server, you might want to view information about a specific LUN by providing the logical name of the LUN as shown below.3.#powermt display dev=all ====> Display All Attached LUNs
Mostly we used to run this command powermt, which will display all the attached logical devices to the server.Pseudo name=disk915
Symmetrix ID=000290103691
Logical device ID=06B8
state=alive; policy=SymmOpt; priority=0; queued-IOs=0;
==============================================================================
--------------- Host --------------- - Stor - -- I/O Path -- -- Stats ---
### HW Path I/O Paths Interf. Mode State Q-IOs Errors
==============================================================================
3 0/4/0/0/0/1.0x5006048c52a862e7.0x40a6000000000000 c14t4d6 FA 8cB active alive 0 2
3 0/4/0/0/0/1.0x5006048c52a862f7.0x40a6000000000000 c15t4d6 FA 8dB active alive 0 2
5 0/5/0/0/0/1.0x5006048c52a862e8.0x40a6000000000000 c16t4d6 FA 9cB active alive 0 2
5 0/5/0/0/0/1.0x5006048c52a862f8.0x40a6000000000000 c17t4d6 FA 9dB active alive 0 2
Pseudo name=disk988
Symmetrix ID=000290103691
Logical device ID=074B
state=alive; policy=SymmOpt; priority=0; queued-IOs=0;
==============================================================================
--------------- Host --------------- - Stor - -- I/O Path -- -- Stats ---
### HW Path I/O Paths Interf. Mode State Q-IOs Errors
==============================================================================
5 0/5/0/0/0/1.0x5006048c52a862e8.0x40dc000000000000 c16t11d4 FA 9cB active alive 0 2
3 0/4/0/0/0/1.0x5006048c52a862e7.0x40dc000000000000 c14t11d4 FA 8cB active alive 0 2
3 0/4/0/0/0/1.0x5006048c52a862f7.0x40ce000000000000 c15t9d6 FA 8dB active alive 0 2
5 0/5/0/0/0/1.0x5006048c52a862f8.0x40ce000000000000 c17t9d6 FA 9dB active alive 0 2
Details:
a. Pseudo name=emcpowera – The device name that can be used by the server. For example,
/dev/emcpowera.
b. CLARiiON ID=AAA00000000000 [dev-server] - EMC CLARiiON CX3 serial number and
the server name.
c. Logical device ID=11111111 [LUN 1] – LUN number. For example, LUN 1.
d. state=alive; policy=CLAROpt; – This displays that this particular LUN is valid and using
the CLAROpt policy.
e. Owner: default=SP B, current=SP B – This indicates that the default (and current) owner for
this LUN is storage processor SP B.
4. powermt check_registration – Display PowerPath Registration Key / Status
# powermt check_registration
Key AAAA-BBBB-CCCC-DDDD-EEEE-FFFF
Product: PowerPath
Capabilities: All
5. #powermt display options ===> Display EMC PowerPath Options
6.#powermt display hba_mode ====> Display PowerPath HBA Mode
Examble output:
Symmetrix logical device count=212
CLARiiON logical device count=0
Hitachi logical device count=0
Invista logical device count=0
HP xp logical device count=0
Ess logical device count=0
HP HSx logical device count=0
==============================================================================
----- Host Bus Adapters --------- ------ I/O Paths ----- Stats
### HW Path Summary Total Dead Q-IOs Mode
==============================================================================
3 0/4/0/0/0/1 optimal 424 0 0 Enabled
5 0/5/0/0/0/1 optimal 424 0 0 Enabled
7.powermt display paths ===> Display available I/O Paths.
8.powermt displays port_mode ===>Display Port Status
9.powermt version ====> Display EMC PowerPath Version
10.powermt check ===>Check the I/O Paths
if you manually removed an I/O path, check command will detect a dead path and remove it from the EMC path list.


