Install Minikube on Windows 10 — WSL2 -Ubuntu 18
💥How to install minikube on windows10 with WSL2 & ubuntu18💥
What is Minikube?
Minikube is a lightweight implementation of Kubernetes. It allows you to create a single node Kubernetes cluster running on a Virtual machine on your local computer. It is very easy to install on any operating system and a great tool to get started with Kubernetes basics, without having to go through the hassle of installing a Kubernetes cluster from scratch.
What is WSL2?
Windows Subsystem for Linux provides a compatibility layer that lets you run Linux binary executables natively on Windows.
WSL2 (Windows Subsystem for Linux version 2) is the latest version of WSL. WSL2 architecture replaces WSL’s architecture by using a lightweight virtual machine. In the new version, you can run an actual Linux kernel which improves overall performance.
After following a few guides, I wasn’t able to get Minikube running under WSL2 on ubuntu18 version. I tried several ways and found this method quick and easy to setup minikube on wsl2. This is specifically for the ubuntu version 18, however for the latest WSL2 versions of ubuntu it is much easier. So this guide serves as a quick TL:DR that worked for me and was repeatable particularly for the older version of ubuntu.
Prerequisites:
1️⃣ Windows 10 with WSL 2 enabled
2️⃣ systemd
3️⃣ git
Let us now install WSL2 systemd and the prerequisites
Make sure you have git installed.
sudo apt install gitThen clone the git repo in which the automation script for systemd setup for WSL containers is.
git clone https://github.com/SreekanthThummala/ubuntu_wsl2_systemd_scripts.git

cd ubuntu_wsl2_systemd_scripts/

bash ubuntu-wsl2-systemd-script.sh
# Enter your password and wait until the script has finished
Close the terminal and reopen a new one and verify its working.
systemctlIf the command displays the list of units, that means the script worked.
Install Minikube

Minikube requires conntrack packages to work properly, so install that prior to moving on.
sudo apt install -y conntrackFinally install minikube itself, and move it to the biniary folder so its globally available when you restart the bash.
Download the latest version of Minikube
curl -Lo minikube https://storage.googleapis.com/minikube/releases/latest/minikube-linux-amd64Make the binary executable
chmod +x ./minikubeMove the binary to your executable path
sudo mv ./minikube /usr/local/bin/
minikube config set driver docker
Attach or Reattach Docker Desktop WSL Integration
Finally start minikube and run the dashboard
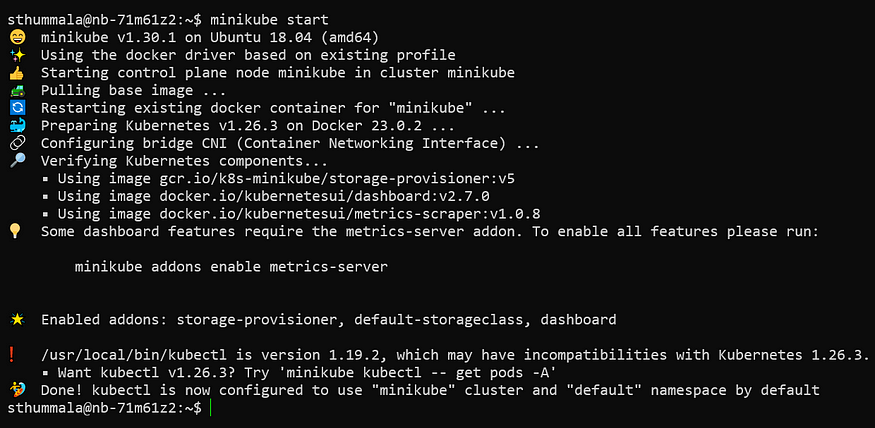
minikube start
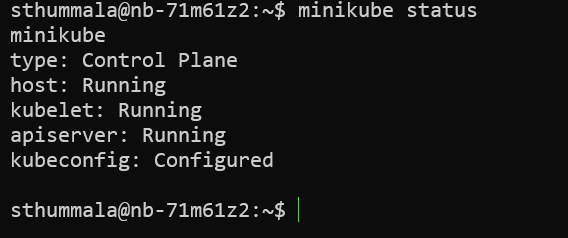
minikube status
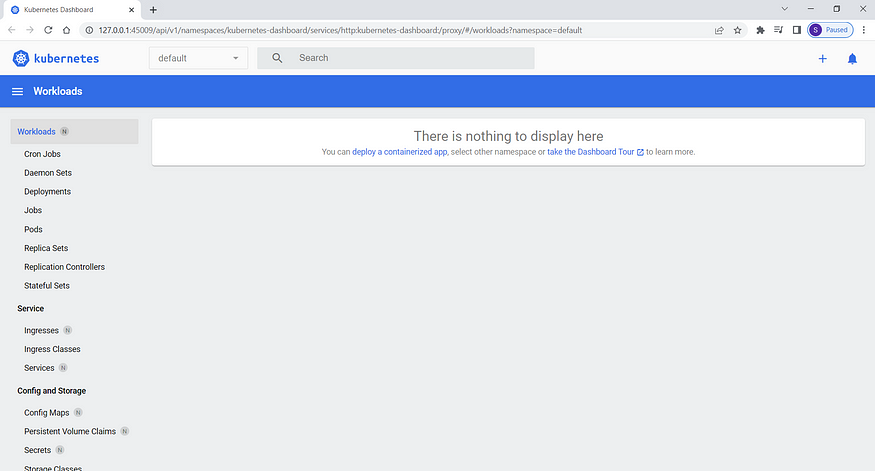
minikube dashboard
And now when you visit the link provided you should see a functional Kubernetes dashboard: http://127.0.0.1:45009/api/v1/namespaces/kubernetes-dashboard/services/http:kubernetes-dashboard:/proxy/#/overview?namespace=default

Try it out and let me know if you face problems, I am happy to help.
If you find this helpful, do Like(clap), Share and Follow me.
AWS Lambda for Real-world Scenarios
AWS Lambda is a powerful and versatile service that allows developers to execute code without the need for provisioning and managing servers. It’s a serverless computing service that allows you to run code in response to events and automatically manages the underlying compute resources for you. In this blog, we’ll explore the basics of AWS Lambda, its features, and real-world scenarios where Lambda can be used to build scalable and efficient applications.
What is AWS Lambda?
AWS Lambda is an event-driven computing service that allows you to run code in response to events like changes to data in an Amazon S3 bucket, or a new record in an Amazon DynamoDB table. With AWS Lambda, you can write your code in a variety of programming languages, including Node.js, Python, Java, C#, and Go. You can also integrate your Lambda functions with other AWS services, such as Amazon S3, Amazon DynamoDB, and Amazon API Gateway.
The key benefits of using AWS Lambda include:
- Serverless: You don’t need to manage servers, operating systems, or infrastructure.
- Pay-per-use: You only pay for the compute time you consume.
- Highly scalable: AWS Lambda automatically scales your application in response to incoming traffic.
- Flexible: You can use a variety of programming languages and integrate with other AWS services.
Real-world Scenarios
Let’s explore a few real-world scenarios where AWS Lambda can be used:
1. Image Processing

Image processing is a common use case for AWS Lambda. For example, you might have an application that allows users to upload images, and you need to perform some processing on those images, such as resizing, cropping, or adding watermarks. You can use Lambda to process the images in response to an S3 event trigger. Here’s an example image processing Lambda function in Python using Pillow, a popular Python library for image processing:
import boto3
from io import BytesIO
from PIL import Image
s3 = boto3.client('s3')

def lambda_handler(event, context):
    # Get the bucket and object key from the event
    bucket = event['Records'][0]['s3']['bucket']['name']
    key = event['Records'][0]['s3']['object']['key']

    # Read the image file from S3
    response = s3.get_object(Bucket=bucket, Key=key)
    image_binary = response['Body'].read()

    # Open the image using Pillow
    image = Image.open(BytesIO(image_binary))

    # Resize the image to a smaller size
    resized_image = image.resize((int(image.width / 2), int(image.height / 2)))

    # Convert the image to JPEG format and save it to S3
    output_buffer = BytesIO()
    resized_image.save(output_buffer, format='JPEG')
    s3.put_object(Body=output_buffer.getvalue(), Bucket=bucket, Key='resized/' + key)

    return {
        'statusCode': 200,
        'body': 'Image processed successfully'
    }
This code uses the AWS SDK for Python (Boto3) to read an image file from an S3 bucket, opens it using Pillow, resizes the image to a smaller size, converts it to JPEG format, and saves the resized image back to the same S3 bucket under a different prefix. The function is triggered by an S3 event, which is sent to the function whenever a new file is uploaded to the source S3 bucket. Note that this code assumes that the input image file is in JPEG format, but you can modify the code to handle other image formats as well.
This code resizes images to 500x500 pixels and saves the resized images to a “resized” folder in the same S3 bucket.
2. Chatbots

Chatbots are another popular use case for AWS Lambda. You can use Lambda to build conversational interfaces for your applications, such as chatbots for customer support, or voice assistants for smart home devices. You can integrate your Lambda function with Amazon Lex, a service that allows you to build chatbots with natural language understanding. Here’s an example Python code snippet for a Lambda function that responds to user input with a greeting:
import json
def lambda_handler(event, context):
    user_input = event['currentIntent']['slots']['UserInput']

    if user_input == 'hello':
        response = {
            "dialogAction": {
                "type": "Close",
                "fulfillmentState": "Fulfilled",
                "message": {
                    "contentType": "PlainText",
                    "content": "Hi there!"
                }
            }
        }
    else:
        response = {
            "dialogAction": {
                "type": "ElicitIntent",
                "message": {
                    "contentType": "PlainText",
                    "content": "I didn't understand. Can you please say that again?"
                }
            }
        }

    return response
The Lambda function is triggered by an event from Amazon Lex, which sends a user input string to the function. The function then checks the user input and responds with a greeting if the input is “hello”, or asks the user to repeat the input if it’s not understood.
3. Data Processing

Data processing is another common use case for AWS Lambda. You can use Lambda to process data in real-time, such as streaming data from Amazon Kinesis, or processing batch data from Amazon S3. For example, you might have a large amount of data stored in an S3 bucket, and you need to process that data in parallel to save time. You can use Lambda to process the data in parallel, and write the results to another S3 bucket. Here’s an example Python code snippet that processes CSV data from S3:
import boto3
import pandas as pd
s3 = boto3.client('s3')

def lambda_handler(event, context):
    bucket = event['Records'][0]['s3']['bucket']['name']
    key = event['Records'][0]['s3']['object']['key']

    obj = s3.get_object(Bucket=bucket, Key=key)
    data = pd.read_csv(obj['Body'])

    # Perform some data processing
    processed_data = data.dropna()

    # Write the processed data to a new S3 bucket
    s3.put_object(Body=processed_data.to_csv(index=False), Bucket='processed-bucket', Key=key)

    return {
        'statusCode': 200,
        'body': 'Data processed successfully'
    }
This code reads a CSV file from an S3 bucket, performs some data processing (in this case, dropping any rows with missing values), and writes the processed data to a new S3 bucket. The function is triggered by an S3 event, which is sent to the function whenever a new file is uploaded to the source S3 bucket.
Conclusion
AWS Lambda is a powerful serverless computing service that allows you to run code in response to events. You can use Lambda to build scalable and efficient applications for a variety of use cases, including image processing, chatbots, and data processing. With Lambda, you don’t need to worry about managing servers or infrastructure, and you only pay for the compute time you consume. I hope this blog has given you a good introduction to AWS Lambda and some ideas for how you can use it in your own applications.
If this post was helpful, please do follow and click the clap 👏 button below to show your support 😄
_ Thank you for reading💚
Follow me on LinkedIn💙


