📢Building a Pull-Based DevOps Pipeline with GitHub Actions and Argo CD🔥
🎈In modern software development, establishing an efficient and reliable DevOps pipeline is crucial for ensuring smooth application delivery and continuous deployment.
💊In this article, we’ll explore a pull-based DevOps pipeline using GitHub Actions for building and Argo CD as the GitOps operator for deployment.
💊This pipeline enables seamless development, containerization, and deployment of web applications.
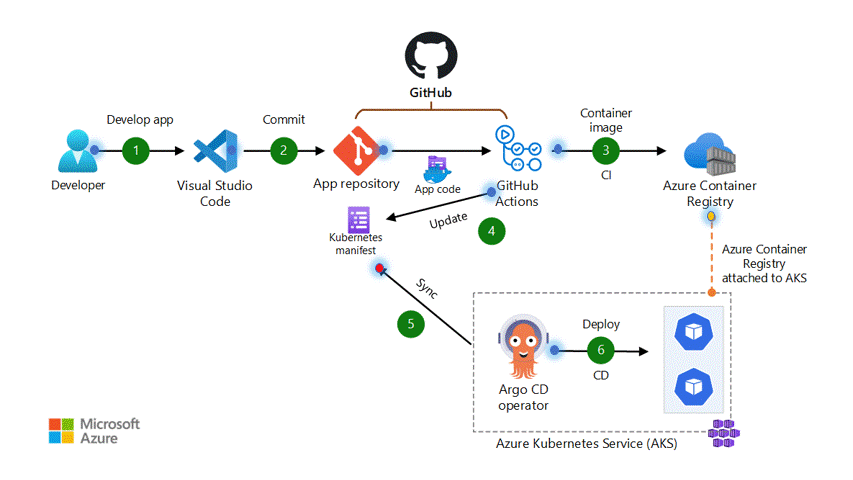
🚩The data flows through the scenario as follows:
1️⃣ App Code Development:
The process begins with developers writing and modifying code using an Integrated Development Environment (IDE) such as Visual Studio Code. This is where the core functionality and features of the web application are developed and tested.
2️⃣ Code Commitment to GitHub Repository:
Once the code is ready for the next stage, it is committed to a GitHub repository. GitHub provides a collaborative platform that supports version control and facilitates seamless collaboration among team members.
3️⃣ GitHub Actions for Build & push:
GitHub Actions is a powerful automation tool that allows developers to define custom workflows triggered by events, such as code commits. In our pipeline, we leverage GitHub Actions to build a container image from the app code. This process typically involves using a Dockerfile to specify the build steps and dependencies required for the application.
After successfully building the container image, GitHub Actions pushes it to an Azure Container Registry (ACR). ACR provides a secure and private repository for storing container images.
4️⃣ Updating Kubernetes Manifest Deployment File.
➡With the container image available in ACR, GitHub Actions updates a Kubernetes manifest deployment file. This file specifies the desired state of the application’s deployment on a Kubernetes cluster. The update involves setting the current image version based on the version number of the container image in ACR. This step ensures that the deployment references the latest version of the container image.
5️⃣ Argo CD pulls from the Git repository.
➡Argo CD, a GitOps operator, continuously monitors a Git repository for changes. When a new commit is detected, Argo CD pulls the updated deployment manifests from the repository. This GitOps approach ensures that the desired state of the application is defined in version-controlled manifests, enabling easier rollbacks, reproducibility, and auditability.
6️⃣ Argo CD deploys the app to the AKS cluster.
➡Once Argo CD pulls the updated deployment manifests, it orchestrates the deployment process to an Azure Kubernetes Service (AKS) cluster. Argo CD compares the desired state defined in the deployment manifests with the current state of the cluster and ensures that the application is deployed and configured accordingly. It handles the synchronization of resources, rolling updates, and rollbacks, if necessary, to maintain the desired state of the application.
Conclusion:
✅By combining the power of GitHub Actions for building and Argo CD for deployment, we’ve established a robust pull-based DevOps pipeline for web application development.
✅This pipeline ensures that changes in the app code trigger an automated build, followed by seamless deployment to an AKS cluster.
✅The pull-based approach, along with version-controlled manifests and container images, enhances traceability, reproducibility, and consistency throughout the development lifecycle.
✅With this pipeline in place, developers can focus on writing code while maintaining a smooth and reliable application delivery process.
🔍Enhance AWS Terraform Code Quality with TFLint: 💡A Must-Have Tool for Effective Infrastructure Management 💡

As organizations increasingly embrace Infrastructure as Code (IaC) practices, tools like Terraform have gained immense popularity for managing cloud infrastructure. With Terraform, developers can define and provision infrastructure resources in a declarative manner. However, maintaining the quality and reliability of Terraform code can be challenging, given the complexity of cloud environments. To mitigate this, TFLint has emerged as a powerful testing tool specifically designed for verifying and enhancing the quality of Terraform code when deploying on Amazon Web Services (AWS).
Understanding TFLint
TFLint is an open-source static analysis tool for Terraform code, created by the Japanese company called Mercari. It focuses on improving code quality by detecting potential errors, security vulnerabilities, and deviations from best practices. TFLint has built-in rules, known as linters, that automatically examine the Terraform configuration files and provide feedback based on predefined conventions and standards. Its extensible plugin architecture allows developers to customize and add additional rules as per their specific requirements.
Benefits of TFLint:
- Error Prevention and Early Detection: TFLint performs static analysis on Terraform code, flagging potential issues before deployment. By catching errors early in the development cycle, it helps reduce costly mistakes and prevents misconfigurations in the AWS environment.
- Compliance and Security: TFLint includes rulesets that enforce best practices and security guidelines provided by AWS. It helps ensure that the infrastructure adheres to industry standards, compliance requirements, and follows the AWS Well-Architected Framework.
- Cost Optimization: TFLint identifies potential resource misconfigurations that may lead to increased costs or inefficient resource usage. By flagging unused resources, inappropriate instance types, or redundant configurations, it assists in optimizing resource allocation and minimizing unnecessary expenses.
- Enhanced Code Quality: TFLint promotes code consistency and readability by enforcing consistent naming conventions, variable usage, and module structures. It encourages adherence to idiomatic Terraform patterns, leading to cleaner, maintainable codebases.
- Integrations and CI/CD Support: TFLint integrates smoothly into existing CI/CD pipelines, enabling automated code analysis. It can be seamlessly integrated with popular CI/CD tools like Jenkins, GitLab CI, and GitHub Actions, ensuring continuous code quality checks as part of the development workflow.
Getting Started with TFLint:
Installation:
TFLint can be installed via package managers like Homebrew (for macOS and Linux), Chocolatey (for Windows), or as a standalone binary from the official GitHub repository.
Bash script (Linux):
curl -s https://raw.githubusercontent.com/terraform-linters/tflint/master/install_linux.sh | bashHomebrew (macOS):
brew install tflintChocolatey (Windows):
choco install tflintNOTE: The Chocolatey package is NOT directly maintained by the TFLint maintainers. The latest version is always available by manual installation.
I have installed on my ubuntu 22.04 machine as shown below.

Docker
Instead of installing directly, you can use the Docker images:
Basic image — ghcr.io/terraform-linters/tflint
A Docker image with TFLint and ruleset plugins — ghcr.io/terraform-linters/tflint-bundle
Example:
docker run --rm -v $(pwd):/data -t ghcr.io/terraform-linters/tflintConfiguration:
TFLint supports a configuration file (.tflint.hcl) that allows customization of rules, exclusion of specific files or directories, and integration with third-party linters. Developers can tailor TFLint to suit their project-specific requirements.
You can install the plugin by adding a config to .tflint.hcl and running tflint --init:
Rules and Plugins:
TFLint provides a comprehensive set of built-in rules for AWS resources. However, additional rules and plugins can be installed from the TFLint community repository to extend its capabilities further.
plugin "aws" {
    enabled = true
    version = "0.24.1"
    source  = "github.com/terraform-linters/tflint-ruleset-aws"
}
Usage:
TFLint can be invoked from the command line by simply running tflint in the root directory of a Terraform project. Developers receive clear and actionable feedback, highlighting the exact line numbers and descriptions of issues found.
Let’s take a closer look at how TFLint works with a sample Terraform project for AWS:
resource "aws_instance" "foo" {
  ami           = "ami-0ff8a91507f77f867"
  instance_type = "t1.2xlarge" # invalid type!
}
Since t1.2xlarge is an invalid instance type, an error will occur when you run terraform apply. But terraform validate and terraform plan cannot find this possible error in advance. That's because it's an AWS provider-specific issue and it's valid as the Terraform Language.
The goal of this ruleset is to find such errors:

Conclusion:
TFLint is an invaluable tool for testing Terraform code for AWS deployments. By integrating TFLint into your development workflow, you can catch potential errors, security vulnerabilities, and deviations from best practices early on. With its ability to provide clear feedback and customizable rules, TFLint helps ensure the quality, security, and efficiency of your infrastructure-as-code projects.
If this post was helpful, please do follow and click the clap 👏 button below to show your support 😄
_ Thank you for reading💚
Follow me on LinkedIn💙
You can buy me a coffee too🤎🤎🤎
Choosing the Right Git Branching Strategy: A Comparative Analysis

Effective branch management is crucial for successful collaboration and efficient development with Git. In this article, we will explore four popular branching strategies — Git-Flow, GitHub-Flow, GitLab-Flow, and Trunk Based Development. By understanding their pros, cons, and ideal use cases, you can determine the most suitable approach for your project.
1. Git-Flow:
Git-Flow is a comprehensive branching strategy that aims to cover various scenarios. It defines specific branch responsibilities, such as main/master for production, develop for active development, feature for new features, release as a gatekeeper to production, and hotfix for addressing urgent issues. The life-cycle involves branching off from develop, integrating features, creating release branches for testing, merging into main/master, and tagging versions.
Pros:
- Well-suited for large teams and aligning work across multiple teams.
- Effective handling of multiple product versions.
- Clear responsibilities for each branch.
- Allows for easy navigation of production versions through tags.
Cons:
- Complexity due to numerous branches, potentially leading to merge conflicts.
- Development and release frequency may be slower due to multi-step process.
- Requires team consensus and commitment to adhere to the strategy.

2. GitHub-Flow:
GitHub-Flow simplifies Git-Flow by eliminating release branches. It revolves around one active development branch (often main or master) that is directly deployed to production. Features and bug fixes are implemented using long-living feature branches. Feedback loops and asynchronous collaboration, common in open-source projects, are encouraged.
Pros:
- Faster feedback cycles and shorter production cycles.
- Ideal for asynchronous work in smaller teams.
- Agile and easier to comprehend compared to Git-Flow.
Cons:
- Merging a feature branch implies it is production-ready, potentially introducing bugs without proper testing and a robust CI/CD process.
- Long-living branches can complicate the process.
- Challenging to scale for larger teams due to increased merge conflicts.
- Supporting multiple release versions concurrently is difficult.

3. GitLab-Flow:
GitLab-Flow strikes a balance between Git-Flow and GitHub-Flow. It adopts GitHub-Flow’s simplicity while introducing additional branches representing staging environments before production. The main branch still represents the production environment.
Pros:
- Can handle multiple release versions or stages effectively.
- Simpler than Git-Flow.
- Focuses on quality with a lean approach.
Cons:
- Complexity increases when maintaining multiple versions.
- More intricate compared to GitHub-Flow.

4. Trunk Based Development:
Trunk Based Development promotes a single shared branch called “trunk” and eliminates long-living branches. There are two variations based on team size: smaller teams commit directly to the trunk, while larger teams create short-lived feature branches. Frequent integration of smaller feature slices is encouraged to ensure regular merging.
Pros:
- Encourages DevOps and unit testing best practices.
- Enhances collaboration and reduces merge conflicts.
- Allows for quick releases.
Cons:
- Requires an experienced team that can slice features appropriately for regular integration.
- Relies on strong CI/CD practices to maintain stability.

Conclusion:
Each branching strategy — Git-Flow, GitHub-Flow, GitLab-Flow, and Trunk Based Development — offers its own advantages and considerations. Choosing the right strategy depends on your specific project requirements. Git-Flow suits large teams and complex projects, while GitHub-Flow excels in open-source and small team environments. GitLab-Flow provides a compromise between Git-Flow and GitHub-Flow, while Trunk Based Development is ideal for experienced teams focused on collaboration and quick releases. Select the strategy that aligns with your team’s capabilities, project complexity, and desired workflow to maximize efficiency and success.


