Choosing the Right Git Branching Strategy: A Comparative Analysis

Effective branch management is crucial for successful collaboration and efficient development with Git. In this article, we will explore four popular branching strategies — Git-Flow, GitHub-Flow, GitLab-Flow, and Trunk Based Development. By understanding their pros, cons, and ideal use cases, you can determine the most suitable approach for your project.
1. Git-Flow:
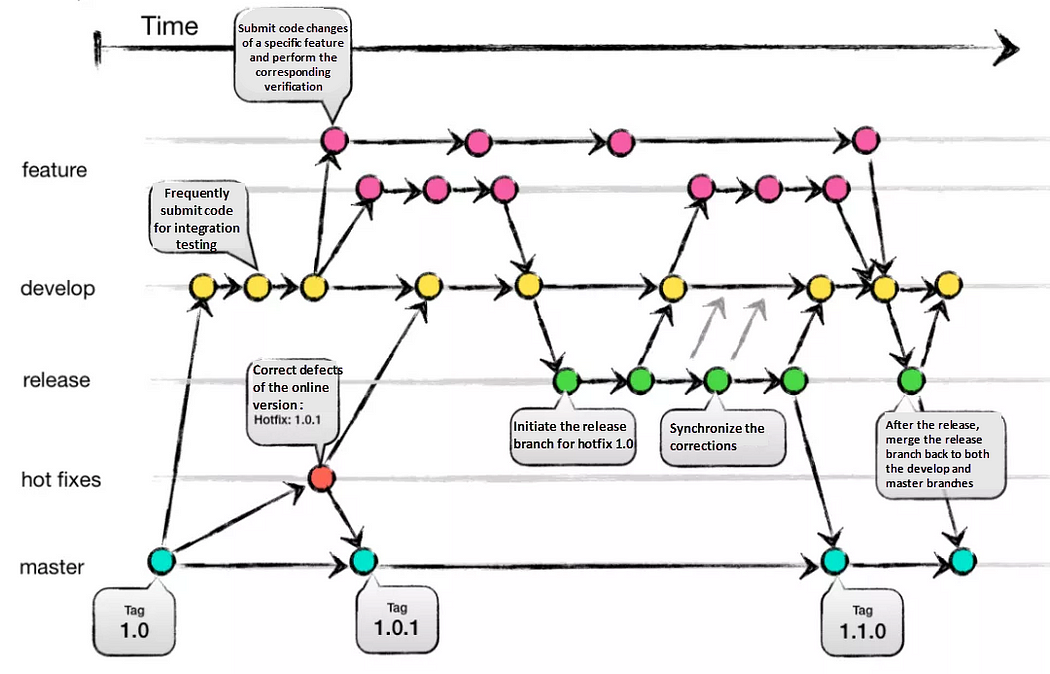
Git-Flow is a comprehensive branching strategy that aims to cover various scenarios. It defines specific branch responsibilities, such as main/master for production, develop for active development, feature for new features, release as a gatekeeper to production, and hotfix for addressing urgent issues. The life-cycle involves branching off from develop, integrating features, creating release branches for testing, merging into main/master, and tagging versions.
Pros:
- Well-suited for large teams and aligning work across multiple teams.
- Effective handling of multiple product versions.
- Clear responsibilities for each branch.
- Allows for easy navigation of production versions through tags.
Cons:
- Complexity due to numerous branches, potentially leading to merge conflicts.
- Development and release frequency may be slower due to multi-step process.
- Requires team consensus and commitment to adhere to the strategy.
2. GitHub-Flow:
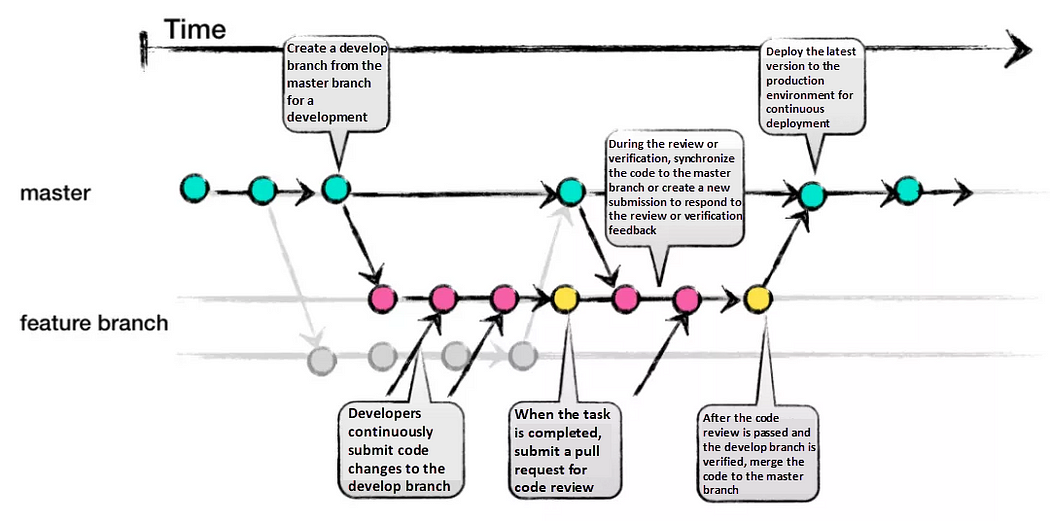
GitHub-Flow simplifies Git-Flow by eliminating release branches. It revolves around one active development branch (often main or master) that is directly deployed to production. Features and bug fixes are implemented using long-living feature branches. Feedback loops and asynchronous collaboration, common in open-source projects, are encouraged.
Pros:
- Faster feedback cycles and shorter production cycles.
- Ideal for asynchronous work in smaller teams.
- Agile and easier to comprehend compared to Git-Flow.
Cons:
- Merging a feature branch implies it is production-ready, potentially introducing bugs without proper testing and a robust CI/CD process.
- Long-living branches can complicate the process.
- Challenging to scale for larger teams due to increased merge conflicts.
- Supporting multiple release versions concurrently is difficult.
3. GitLab-Flow:
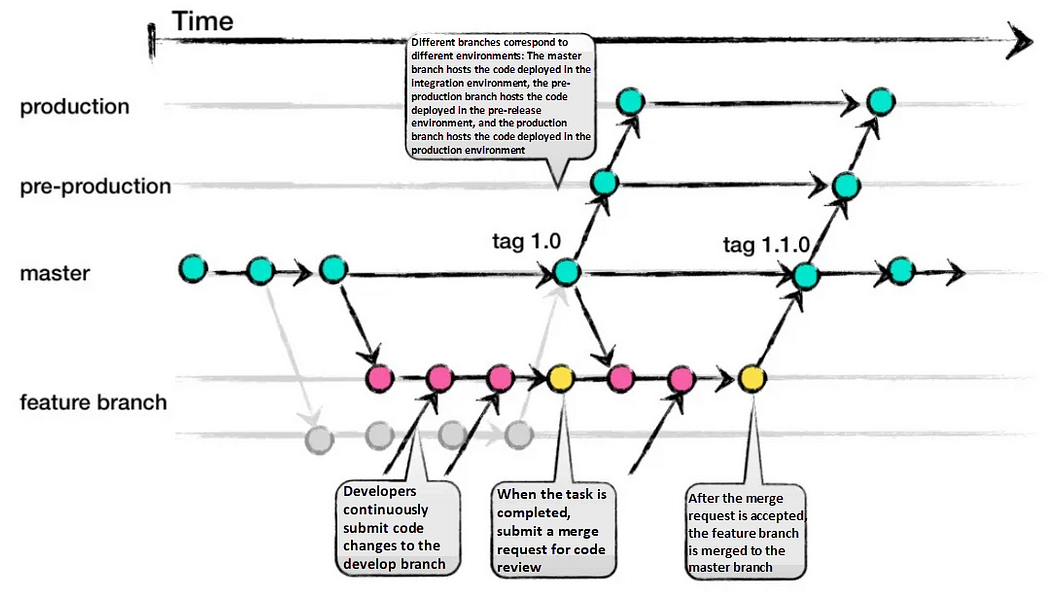
GitLab-Flow strikes a balance between Git-Flow and GitHub-Flow. It adopts GitHub-Flow’s simplicity while introducing additional branches representing staging environments before production. The main branch still represents the production environment.
Pros:
- Can handle multiple release versions or stages effectively.
- Simpler than Git-Flow.
- Focuses on quality with a lean approach.
Cons:
- Complexity increases when maintaining multiple versions.
- More intricate compared to GitHub-Flow.
4. Trunk Based Development:
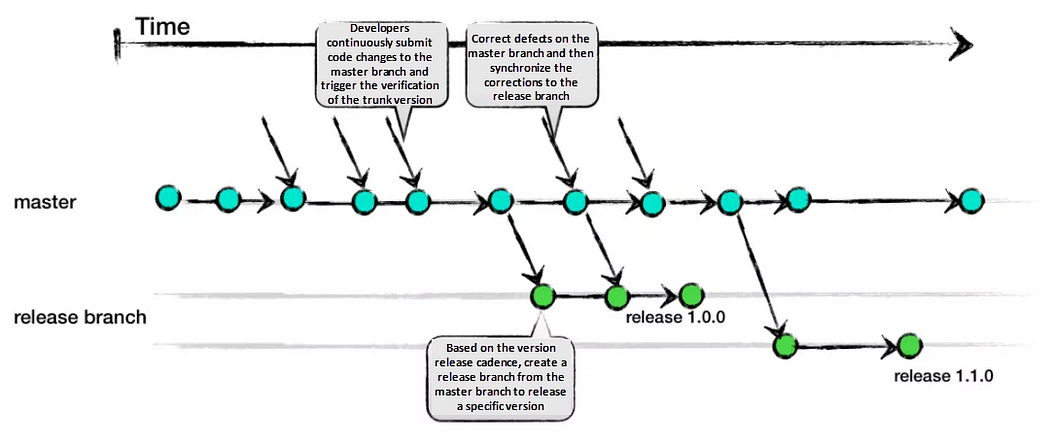
Trunk Based Development promotes a single shared branch called “trunk” and eliminates long-living branches. There are two variations based on team size: smaller teams commit directly to the trunk, while larger teams create short-lived feature branches. Frequent integration of smaller feature slices is encouraged to ensure regular merging.
Pros:
- Encourages DevOps and unit testing best practices.
- Enhances collaboration and reduces merge conflicts.
- Allows for quick releases.
Cons:
- Requires an experienced team that can slice features appropriately for regular integration.
- Relies on strong CI/CD practices to maintain stability.
Conclusion:
Each branching strategy — Git-Flow, GitHub-Flow, GitLab-Flow, and Trunk Based Development — offers its own advantages and considerations. Choosing the right strategy depends on your specific project requirements. Git-Flow suits large teams and complex projects, while GitHub-Flow excels in open-source and small team environments. GitLab-Flow provides a compromise between Git-Flow and GitHub-Flow, while Trunk Based Development is ideal for experienced teams focused on collaboration and quick releases. Select the strategy that aligns with your team’s capabilities, project complexity, and desired workflow to maximize efficiency and success.
_ Thank you for reading💚
DevOps Zero to Hero — Day 20: High Availability & Disaster Recovery!!
Welcome back to our 30-day course on cloud computing! Today, we dive into the critical topics of High Availability (HA) and Disaster Recovery (DR). As businesses move their operations to the cloud, ensuring continuous availability and preparedness for unforeseen disasters becomes paramount. In this blog, we will discuss the principles, strategies, and implementation of HA and DR in the cloud. So, let’s get started!

Designing highly available and fault-tolerant systems:
High Availability refers to the ability of a system to remain operational and accessible, even in the face of component failures. Fault-tolerant systems are designed to handle errors gracefully, ensuring minimal downtime and disruptions to users. To achieve this, we use redundant components and implement fault tolerance mechanisms.
Let’s elaborate on designing a highly available and fault-tolerant system with an example project called “Online Shopping Application.”
Our project is an online shopping application that allows users to browse products, add them to their carts, and make purchases. As this application will handle sensitive customer data and financial transactions, it’s crucial to design it to be highly available and fault-tolerant to ensure a seamless shopping experience for users.
High Availability Architecture:
To achieve high availability, we will design the application with the following components:
1. Load Balancer: Use a load balancer to distribute incoming traffic across multiple application servers. This ensures that if one server becomes unavailable, the load balancer redirects traffic to the healthy servers.
2. Application Servers: Deploy multiple application servers capable of handling user requests. These servers should be stateless, meaning they do not store session-specific data, which allows for easy scaling.
3. Database: Utilize a highly available database solution, such as a replicated database cluster or a managed database service in the cloud. Replication ensures data redundancy, and automatic failover mechanisms can switch to a secondary database node in case of a primary node failure.
4. Content Delivery Network (CDN): Implement a CDN to cache and serve static assets, such as product images and CSS files. This improves the application’s performance and reduces load on the application servers.
Fault-Tolerant Strategies:
To make the system fault-tolerant, we will implement the following strategies:
1. Database Replication: Set up database replication to automatically create copies of the primary database in secondary locations. In case of a primary database failure, one of the replicas can be promoted to take over the role.
2. Redundant Components: Deploy redundant application servers and load balancers across different availability zones or regions. This ensures that if one zone or region experiences a service outage, traffic can be redirected to another zone or region.
3. Graceful Degradation: Implement graceful degradation for non-critical services or features. For example, if a payment gateway is temporarily unavailable, the application can continue to function in a degraded mode, allowing users to browse and add products to their carts until the payment gateway is restored.
Real-Time Inventory Management:
To ensure real-time inventory management, we can use message queues or event-driven architectures. When a user makes a purchase, a message is sent to update the inventory status. Multiple consumers can listen to these messages and update the inventory in real-time.
Testing the High Availability and Fault Tolerance:
To test the system’s high availability and fault tolerance, we can simulate failures and monitor the system’s behavior:
1. Failover Testing
2. Load Testing
3. Redundancy Testing
4. Graceful Degradation Testing
By incorporating these design principles and testing strategies, our Online Shopping Application will be highly available, fault-tolerant, and capable of handling high user traffic while ensuring data integrity and security. These concepts can be applied to various web applications and e-commerce platforms to provide a reliable and seamless user experience.
Implementing disaster recovery plans and strategies:
Disaster Recovery is the process of restoring operations and data to a pre-defined state after a disaster or system failure. It involves planning, preparation, and implementation of strategies to recover the system with minimal data loss and downtime.
Let’s elaborate on how we can incorporate disaster recovery into our “Online Shopping Application” project.
Disaster Recovery Plan for Online Shopping Application:
1. Data Backup and Replication:
Regularly back up the application’s critical data, including customer information, product catalogs, and transaction records. Utilize database replication to automatically create copies of the primary database in secondary locations.
2. Redundant Infrastructure:
Deploy redundant infrastructure across multiple availability zones or regions. This includes redundant application servers, load balancers, and databases. In case of a catastrophic event affecting one location, the application can failover to another location without significant downtime.
3. Automated Monitoring and Alerting:
Set up automated monitoring for key components of the application, including servers, databases, and network connectivity. Implement alerting mechanisms to notify the operations team in real-time if any critical component faces performance issues or failures.
4. Multi-Cloud Strategy:
Consider using a multi-cloud approach to ensure disaster recovery across different cloud providers. This strategy reduces the risk of a single cloud provider’s outage affecting the entire application.
5. Disaster Recovery Testing:
Regularly conduct disaster recovery testing to ensure the effectiveness of the plan. This can include running simulations of various disaster scenarios and validating the recovery procedures.
Disaster Recovery Strategy for Database:
The database is a critical component of our application, and ensuring its availability and recovery is essential.
Here’s how we can implement a disaster recovery strategy for the database:
1. Database Replication: Set up asynchronous replication between the primary database and one or more secondary databases in separate locations. This ensures that data changes are automatically propagated to the secondary databases.
2. Automated Failover: Implement an automated failover mechanism that can detect the failure of the primary database and automatically promote one of the secondary databases to become the new primary. This process should be seamless and quick to minimize downtime.
3. Backups: Regularly take backups of the database and store them securely in an offsite location. These backups should be tested for restoration periodically to ensure data integrity.
4. Point-in-Time Recovery: Set up point-in-time recovery options, allowing you to restore the database to a specific time in the past, which can be useful for recovering from data corruption or accidental deletions.
Disaster Recovery Strategy for Application Servers:
The application servers are responsible for serving user requests. Here’s how we can implement a disaster recovery strategy for the application servers:
1. Auto-Scaling and Load Balancing: Use auto-scaling groups to automatically add or remove application server instances based on traffic load. Employ a load balancer to distribute incoming traffic across multiple instances.
2. Cross-Region Deployment: Deploy application servers in multiple regions and load balance traffic across them. In case of a region failure, traffic can be routed to the servers in other regions.
3. Containerization: Consider containerizing the application using technologies like Docker and Kubernetes. Containers allow for easier deployment and scaling across multiple environments, facilitating disaster recovery.
Disaster Recovery Testing:
Regular disaster recovery testing is crucial to validate the effectiveness of the plan and the strategies implemented. The testing process should involve simulating various disaster scenarios and executing recovery procedures.
Some testing approaches include:
1. Tabletop Exercise
2. Partial Failover Testing
3. Full Failover Testing
4. Recovery Time Objective (RTO) Testing
We ensure that the application is resilient and can recover swiftly from any potential disaster, minimizing downtime and providing a reliable shopping experience for users.
Testing and simulating disaster scenarios:
Testing and simulating disaster scenarios is a critical part of disaster recovery planning. It allows you to identify weaknesses, validate the effectiveness of your recovery strategies, and build confidence in your system’s ability to withstand real disasters.
Let’s elaborate on the testing process and the different ways to simulate disaster scenarios:
1. Tabletop Exercise:
A tabletop exercise is a theoretical walkthrough of disaster scenarios with key stakeholders and team members. This exercise is usually conducted in a meeting room, and participants discuss their responses to simulated disaster situations. The goal is to evaluate the effectiveness of the disaster recovery plan and identify any gaps or areas that require improvement.
2. Partial Failover Testing:
Partial failover testing involves deliberately causing failures in specific components or services and observing how the system responds. For example, you can simulate a database failure or take down one of the application servers. This type of testing helps validate the system’s ability to isolate failures and recover from them without affecting the overall system.
3. Full Failover Testing:
Full failover testing is more comprehensive and involves simulating a complete disaster scenario where the entire primary environment becomes unavailable. This could be achieved by shutting down the primary data center or cloud region. During this test, the secondary environment should take over seamlessly and continue providing service without significant downtime.
4. Red-Blue Testing:
Red-Blue testing, also known as A/B testing or blue-green deployment, involves running two identical production environments in parallel. One environment (e.g., blue) serves as the primary production environment, while the other (e.g., red) is the secondary environment. During the test, traffic is redirected from the blue environment to the red environment. This allows you to validate the effectiveness of the secondary environment and ensure it can handle production-level traffic.
5. Chaos Engineering:
Chaos engineering is a discipline where controlled experiments are conducted to intentionally inject failures and disruptions into the system. The goal is to proactively identify weaknesses and build resilience. Popular tools like Chaos Monkey and Gremlin are used to carry out these experiments.
6. Ransomware Simulation:
Simulating a ransomware attack is a practical way to test your data backup and recovery processes. Create a test environment and execute a simulated ransomware attack to assess how well you can restore data from backups.
7. Network Partition Testing:
Network partition testing involves simulating network failures that isolate different components of the system. This type of testing helps evaluate the system’s behavior when certain components cannot communicate with each other.
8. Graceful Degradation Testing:
In this test, you intentionally reduce resources available to the system and observe how it gracefully degrades performance rather than completely failing. This helps identify which non-critical services can be temporarily reduced to ensure critical functionality remains operational during resource constraints.
9. Recovery Time Objective (RTO) Testing:
Measure the time it takes to recover the system after a disaster. Set specific recovery time objectives and track your actual recovery time during testing. If the recovery time exceeds the desired RTO, investigate ways to improve it.
10. Post-Disaster Validation:
After performing disaster recovery testing, it is essential to validate that the system is fully operational and that no data has been lost or corrupted. Perform comprehensive tests on various parts of the application to ensure it functions as expected.
Regularly conducting disaster recovery testing is essential to refine and optimize your disaster recovery plan continuously. It helps build confidence in your system’s resilience and ensures that your organization is well-prepared to handle any potential disaster effectively.
Most asked interview questions with respect to high-availability and disaster recovery are as below:
- How would you design a highly available architecture for a web application that can handle sudden spikes in traffic?
- What steps would you take to implement an effective disaster recovery plan for an e-commerce website?
- Can you describe a scenario where your disaster recovery plan was tested, and what did you learn from the testing process?
- How did you conduct load testing to evaluate the scalability of your system for handling peak traffic?
- How do you ensure the accuracy and reliability of backups during disaster recovery testing?
- How would you handle session management in a highly available and stateless web application?
That concludes Day 20 of our cloud computing course! I hope you found this blog insightful and practical. Tomorrow, we will delve into Continuous Documentation. Stay tuned for more exciting content!!
🚀DevOps Zero to Hero: 💡Day 19 — Test Automation🚦

Welcome to Day 19 of our 30-day course dedicated to mastering Test Automation! Today, we will delve into the realm of test automation frameworks, such as Selenium and Cypress. Our focus will be on designing and implementing automated tests for web applications and seamlessly integrating them into your CI/CD pipeline.
Introduction to Test Automation Frameworks:
In the realm of software testing, test automation frameworks are instrumental in facilitating efficient and reliable automated testing. These frameworks offer guidelines, best practices, and tools to structure and execute automated tests effectively. They simplify the complexities of test automation, making it user-friendly for testers and developers to create and maintain automated test suites.
1. Selenium:
Selenium stands out as a widely used open-source test automation framework for web applications. It empowers testers to automate interactions with web browsers and conduct seamless functional testing. Supporting multiple programming languages like Java, Python, C#, JavaScript, Ruby, and more, Selenium caters to testers and developers with diverse language preferences.
Key Features of Selenium:
- Browser Automation: Control web browsers programmatically to simulate user interactions.
- Cross-Browser Testing: Supports various browsers, including Chrome, Firefox, Safari, Edge, and Internet Explorer.
- Element Locators: Provides diverse locators for identifying elements on web pages.
- Parallel Execution: Executes tests in parallel, reducing overall test execution time.
- Integration with Testing Frameworks: Integrates seamlessly with testing frameworks like TestNG and JUnit.
2. Cypress:
Cypress emerges as a modern and developer-friendly end-to-end testing framework designed primarily for web applications. Written in JavaScript, Cypress boasts a straightforward API, making it easy for developers to write and maintain tests. Unlike traditional testing tools, Cypress operates directly in the browser, facilitating close interaction with the application under test.
Key Features of Cypress:
- Real-Time Reloading: Provides real-time reloading as tests are written, enhancing the development and debugging process.
- Time Travel: Allows pausing and debugging tests at any point during execution.
- Automatic Waiting: Waits for elements to appear on the page before interaction, eliminating the need for explicit waits.
- Debuggability: Offers comprehensive debugging tools like Chrome DevTools, logging detailed information about test runs.
- Snapshot and Video Recording: Captures screenshots and records videos of test runs, aiding in diagnosing failures.
Choosing Between Selenium and Cypress:
The choice between Selenium and Cypress depends on project requirements and team expertise. Consider factors such as application type, programming language preferences, testing speed, debugging capabilities, and community support.
Here are some factors to consider:
Application Type: If you primarily work with traditional web applications and require cross-browser testing, Selenium might be a more suitable choice. On the other hand, if you’re building modern web applications and prefer a more developer-friendly experience, Cypress might be a better fit.
Programming Language: If you have a strong background in a specific programming language, consider whether Selenium’s language support aligns with your expertise.
Testing Speed: Cypress offers fast test execution due to its architecture, while Selenium might take longer for complex test suites.
Debugging: Cypress provides advanced debugging capabilities, making it easier to identify and troubleshoot issues.
Community and Support: Selenium has been around for a longer time and has a larger community and more extensive documentation. However, Cypress has gained significant popularity and community support as well.
Ultimately, both Selenium and Cypress are powerful test automation frameworks, and the choice depends on your specific project needs and team preferences.
Designing and Implementing Automated Tests for Web Applications:
Let’s walk through an example project for designing and implementing automated tests for a simple web application using Selenium (with Python) and Cypress (with JavaScript).
Example Project: Automated Tests for a ToDo List Web Application.
For this example, we’ll create automated tests for a basic ToDo list web application. The application allows users to add tasks, mark them as completed, and delete tasks.
Prerequisites:
a. Install Python
b. Install Selenium WebDriver for Python
c. Download the appropriate WebDriver (e.g., ChromeDriver) and add it to your system’s PATH
Test Scenario: Verify that tasks can be added, marked as completed, and deleted in the ToDo list application.
1. Create a new Python file named test_todo_list_selenium.py.
2. Implement the test cases using Selenium:
from selenium import webdriver
import time

# Initialize the WebDriver (using Chrome in this example)
driver = webdriver.Chrome()
# Open the ToDo list application
driver.get("https://exampletodolistapp.com")
# Test Case 1: Add a task
task_input = driver.find_element_by_id("new-task")
add_button = driver.find_element_by_id("add-button")
task_input.send_keys("Buy groceries")
add_button.click()
# Verify that the task has been added to the list
task_list = driver.find_element_by_id("task-list")
assert "Buy groceries" in task_list.text
# Test Case 2: Mark task as completed
complete_checkbox = driver.find_element_by_xpath("//span[text()='Buy groceries']/preceding-sibling::input[@type='checkbox']")
complete_checkbox.click()
# Verify that the task is marked as completed
assert "completed" in complete_checkbox.get_attribute("class")
# Test Case 3: Delete the task
delete_button = driver.find_element_by_xpath("//span[text()='Buy groceries']/following-sibling::button")
delete_button.click()
# Verify that the task has been removed from the list
assert "Buy groceries" not in task_list.text
# Close the browser
driver.quit()
3. Run the test using python test_todo_list_selenium.py.
Designing and Implementing Automated Tests with Cypress (JavaScript)
Prerequisites:
a. Install Node.js
b. Install Cypress
Test Scenario: Verify that tasks can be added, marked as completed, and deleted in the ToDo list application.
1. Create a new folder for the Cypress project and navigate into it.
2. Initialize a new Cypress project using the following command:
npx cypress open3. After the Cypress application launches, you’ll find the cypress/integration folder.
4. Create a new file named todo_list_cypress.spec.js.
5. Implement the test cases using Cypress:
describe('ToDo List Tests', () => {
  beforeEach(() => {
    cy.visit('https://exampletodolistapp.com');
  });

it('Adds a task', () => {
    cy.get('#new-task').type('Buy groceries');
    cy.get('#add-button').click();
    cy.contains('Buy groceries').should('be.visible');
  });
  it('Marks a task as completed', () => {
    cy.get('#new-task').type('Buy groceries');
    cy.get('#add-button').click();
    cy.get('input[type="checkbox"]').check();
    cy.get('input[type="checkbox"]').should('be.checked');
  });
  it('Deletes a task', () => {
    cy.get('#new-task').type('Buy groceries');
    cy.get('#add-button').click();
    cy.get('button').click();
    cy.contains('Buy groceries').should('not.exist');
  });
});
6. Click on the test file (todo_list_cypress.spec.js) in the Cypress application to run the test.
Cypress will open a browser window, and you will see the automated tests executing. You can also view detailed logs, screenshots, and videos of the test execution in the Cypress application.
In this example project, we demonstrated how to design and implement automated tests for a ToDo list web application using both Selenium with Python and Cypress with JavaScript. Selenium offers flexibility across various programming languages and browsers, while Cypress provides a more streamlined and developer-friendly experience for modern web applications.
Integrating Automated Tests into the CI/CD Pipeline:
Integrating automated tests into the CI/CD pipeline is a pivotal step in the software development process. It ensures that tests are executed automatically upon code changes, facilitating early issue detection and resolution.
Let’s elaborate on the steps to integrate automated tests into the CI/CD pipeline:
1. Set Up a Version Control System:
The first step is to set up a version control system (VCS) like Git. Version control allows you to manage changes to your codebase, collaborate with team members, and keep track of different versions of your software.
2. Create a CI/CD Pipeline:
Next, you need to set up a CI/CD pipeline using a CI/CD tool of your choice. Popular CI/CD tools include Jenkins, GitLab CI/CD, Travis CI, CircleCI, and GitHub Actions.
The CI/CD pipeline consists of a series of automated steps that are triggered whenever changes are pushed to the version control repository. The pipeline typically includes steps like building the application, running automated tests, deploying the application to staging or production environments, and generating reports.
3. Configuring the CI/CD Pipeline for Automated Tests:
To integrate automated tests into the CI/CD pipeline, you need to configure the pipeline to execute the test suite automatically after each code commit or pull request.
Here are the general steps for this configuration:
Install Dependencies: Ensure that the required dependencies (e.g., programming languages, testing frameworks, and drivers for Selenium) are installed on the CI/CD server or agent.
Check Out Code: The CI/CD pipeline should check out the latest code from the version control repository.
Build the Application: If necessary, build the application to create an executable or distributable artifact.
Run Automated Tests: Execute the automated test suite using the appropriate testing framework. For example, if you’re using Selenium with Python, run the Python script that contains your Selenium tests.
Reporting and Exit Status: Capture the test results and generate test reports. Most testing frameworks provide options to output test results in a machine-readable format (e.g., JUnit XML). Additionally, ensure that the pipeline exits with an appropriate exit status based on the test results (e.g., exit with code 0 for success and a non-zero code for test failures).
4. Handling Test Results:
The CI/CD pipeline should handle the test results appropriately. If any tests fail, developers should be notified immediately so they can address the issues. Some CI/CD tools provide built-in integrations with messaging platforms like Slack or email services to send notifications.
5. Parallel and Distributed Testing (Optional):
For larger projects with a significant number of automated tests, consider running tests in parallel or distributing them across multiple agents or machines to speed up test execution.
6. Post-Build Actions:
Depending on your workflow, you might also consider triggering deployments to staging or production environments after a successful build and test run. However, it’s essential to ensure that your automated tests provide adequate coverage and validation before proceeding with deployment.
Integrating automated tests into the CI/CD pipeline is a powerful practice that can significantly improve the quality and reliability of your software. It helps catch bugs early, provides rapid feedback to developers, and ensures that your application remains in a deployable state at all times.
By configuring your CI/CD pipeline to run automated tests automatically, you enable a seamless integration of testing into your development workflow, making it easier to deliver high-quality software to end-users with greater confidence.
Conclusion:
Mastering test automation with frameworks like Selenium and Cypress is paramount for modern software development. By seamlessly integrating automated tests into your CI/CD pipeline, you elevate your development workflow, ensuring the reliability of your web applications.
Congratulations on completing Day 19 of our course! Tomorrow, we will explore deployment strategies. Happy Learning!


