🚀DevOps Zero to Hero: 💡Day 12 Microservices Architecture: Unleashing Scalability and Flexibility
In our quest to become DevOps heroes, we dive into a fundamental aspect of modern software development: Microservices Architecture. This revolutionary approach has redefined how applications are designed, developed, and operated, offering a plethora of benefits while presenting unique challenges. In this article, we’ll delve into the depths of microservices architecture, explore its advantages and drawbacks, dissect its architectural principles, and present real-world scenarios for a comprehensive understanding.
Defining Microservices Architecture:
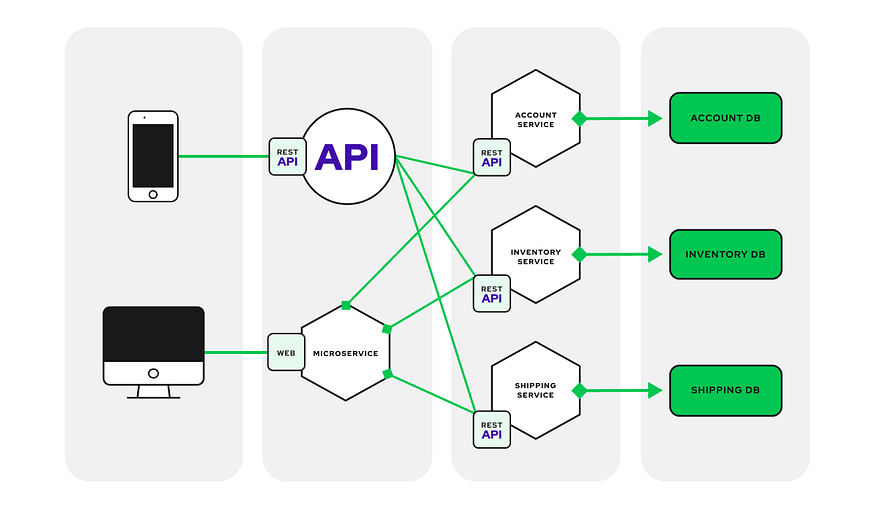
Microservices architecture is an architectural style where a complex application is decomposed into smaller, independently deployable services. Each service represents a specific business capability and communicates with others through well-defined APIs. Unlike monolithic architectures, which encapsulate all functionalities within a single codebase, microservices embrace modularity and autonomy.
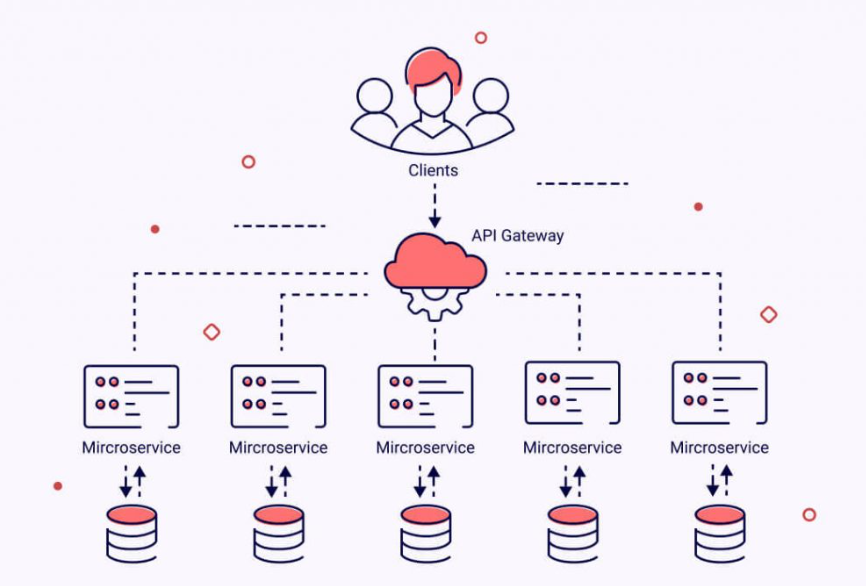
Benefits of Microservices Architecture:
1. Scalability and Efficiency: Microservices enable granular scaling. You can scale individual services based on demand, optimizing resource utilization and enhancing application performance.
2. Enhanced Maintainability: Each microservice encapsulates a single business function. This modularity facilitates easier maintenance and updates, as changes in one service don’t ripple through the entire application.
3. Flexibility in Technology Stack: Microservices allow the use of different programming languages and frameworks for each service. This flexibility accommodates the best-suited technology for each service’s unique requirements.
4. Fault Isolation and Resilience: Failures in one microservice don’t cascade to others. Isolated failures enhance overall application resilience and fault tolerance.
5. Rapid Deployment and Innovation: Microservices align seamlessly with continuous deployment. This accelerates feature delivery, reducing time-to-market for innovations.
Drawbacks of Microservices Architecture:
1. Increased Complexity: Managing a network of microservices introduces complexity in terms of orchestration, deployment, and monitoring.
2. Inter-Service Communication Overhead: Microservices communicate over networks, potentially leading to increased latency and network traffic.
3. Data Consistency: Maintaining consistent data across services can be challenging, necessitating careful design and synchronization mechanisms.
4. Operational Overhead: Monitoring, scaling, and managing multiple services demand robust operational practices and tools.
Microservices Architecture in Action:
Scenario 1: E-commerce Platform
Consider an e-commerce platform comprising various services: user authentication, product catalog, order processing, and payment gateway.
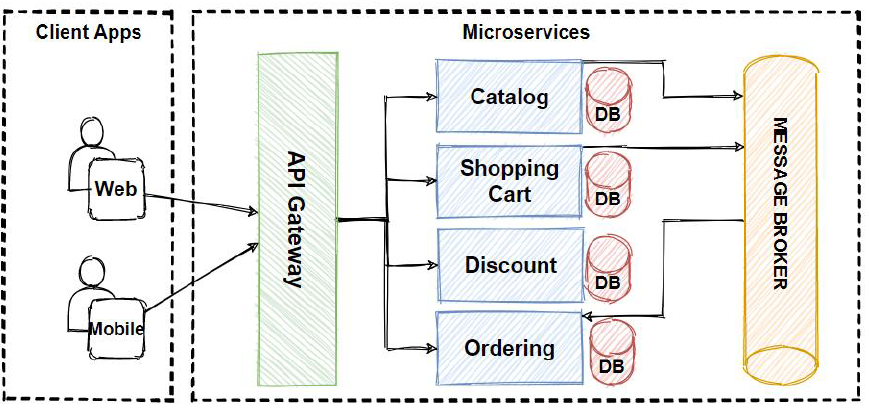
- The product catalog service can evolve independently, showcasing new products or updating prices without impacting other services.
- During flash sales, the payment gateway service can be scaled up to handle higher transaction volumes, ensuring seamless purchases.
Scenario 2: Healthcare Management System
Imagine a healthcare system encompassing patient records, appointment scheduling, billing, and prescription management.
- The appointment scheduling service can be scaled independently during peak hours to handle increased appointment requests.
- The prescription management service can be rapidly updated to adhere to regulatory changes without affecting other functionalities.
Architectural Principles of Microservices:
- Decomposition: Divide the application into small, focused services based on business capabilities.
2. Independence: Each service should operate independently, with its own data and logic.
3. API-First: Define clear and well-documented APIs to facilitate communication between services.
4. Autonomy: Services should be responsible for their own data management and behavior.
5. Decentralized Data Management: Avoid sharing databases; use event-driven approaches or distributed databases.
6. Infrastructure Automation: Employ infrastructure-as-code principles for efficient service provisioning.
Conclusion:
Microservices architecture epitomizes the evolution of software engineering. Its benefits, such as scalability, maintainability, and flexibility, are evident in real-world scenarios. Yet, its complexity and challenges highlight the importance of robust monitoring, communication patterns, and data management. By grasping the architectural principles and navigating these intricacies, you’re poised to ascend to the ranks of DevOps heroes who can craft resilient, adaptive, and efficient applications that meet the demands of today’s dynamic digital landscape.
Follow me on LinkedIn https://www.linkedin.com/in/sreekanththummala/
🚀DevOps Zero to Hero: 💡Day 11 — Mastering Performance Testing and Optimization🛠
Welcome to Day 11 of our 30-day DevOps journey! In today’s installment of the “DevOps Zero to Hero” series, we’ll dive into the realm of performance testing and optimization. As organizations strive to deliver high-quality applications, the importance of ensuring optimal performance cannot be overstated. Join us as we explore best practices, tools, and techniques to master performance testing and optimize your DevOps processes.
The Significance of Performance Testing and Optimization
In the dynamic landscape of software development, performance is a critical factor that directly impacts user experience, customer satisfaction, and business success. Performance testing and optimization play a pivotal role in identifying bottlenecks, improving response times, and ensuring applications can handle varying workloads. Let’s uncover the key benefits and best practices:
Benefits of Performance Testing:
1. User Satisfaction: High-performing applications provide a seamless user experience, boosting user satisfaction and retention.
2. Business Reputation: Slow or unreliable applications can tarnish your business’s reputation, while optimized ones enhance it.
3. Scalability: Performance testing helps identify scalability limits, ensuring your application can handle increased user loads.
4. Resource Efficiency: Optimization reduces resource consumption, leading to cost savings and efficient infrastructure utilization.
Best Practices for Performance Testing and Optimization:
1. Set Clear Goals: Define performance benchmarks and expectations based on user behavior and application requirements.
2. Test Early and Often: Integrate performance testing throughout the development lifecycle, catching issues early.
3. Realistic Scenarios: Design test scenarios that mimic real-world usage patterns, covering both normal and peak loads.
4. Monitor and Analyze: Implement continuous monitoring to identify performance trends, allowing for proactive optimization.
5. Load Balancing: Distribute traffic efficiently using load balancers to prevent single points of failure.
6. Caching Strategies: Implement caching mechanisms to reduce the load on backend resources and enhance response times.
7. Database Optimization: Optimize database queries, indexes, and connections to prevent database-related performance bottlenecks.
8. Content Delivery Networks (CDNs): Utilize CDNs to deliver static content more efficiently, reducing server load and latency.
9. Code Profiling: Use profiling tools to identify code bottlenecks and optimize resource-intensive functions.
Tools and Techniques for Performance Testing
To achieve optimal performance, you need the right tools and techniques at your disposal. Let’s explore some popular tools and approaches for performance testing and optimization:
Load Testing Tools:
1. Apache JMeter: A widely-used open-source tool for load testing, supporting various protocols and providing rich reporting capabilities.
2. Gatling: An open-source load testing framework that offers high performance and scalability, suitable for complex scenarios.
3. Locust: Another open-source tool focused on simplicity and flexibility, enabling you to define user behavior using Python scripts.
Monitoring and Profiling Tools:
1. New Relic: Provides real-time application monitoring, allowing you to identify performance issues and optimize code.
2. AppDynamics: Offers end-to-end visibility into application performance, enabling proactive monitoring and optimization.
3. Dynatrace: Utilizes AI-driven insights to monitor and optimize applications in real-time.
Caching and Content Delivery:
1. Varnish: A powerful caching HTTP reverse proxy that improves website performance by storing copies of frequently accessed resources.
2. Cloudflare: A popular CDN and security platform that optimizes content delivery and offers DDoS protection.
Incorporating Performance Testing and Optimization into DevOps
Continuous Performance Testing:
1. Automate Testing: Integrate performance testing into your CI/CD pipelines to ensure consistent testing with every code change.
2. Scalability Testing: Simulate increasing loads during testing to determine application scalability and threshold limits.
Performance Optimization:
1. Code Reviews: Include performance considerations in code reviews to catch and address potential bottlenecks early.
2. Regular Monitoring: Continuously monitor application performance in production and address issues as they arise.
3. A/B Testing: Conduct A/B testing to compare different performance optimization strategies and choose the most effective one.
Conclusion
Performance testing and optimization are integral to creating high-performing applications that meet user expectations and business goals. By following best practices, utilizing appropriate tools, and integrating performance testing and optimization into your DevOps processes, you can deliver applications that provide a seamless experience to users.
I hope this article provides valuable insights into mastering performance testing and optimization. If you have any questions or wish to explore further, feel free to leave a comment below. Happy optimizing!
Follow me on LinkedIn — https://www.linkedin.com/in/sreekanththummala/
DevOps Zero to Hero: Day10 - Exploring Security in DevOps
Welcome back to our “DevOps Zero to Hero” series! Today, we’re venturing into the essential realm of security in the world of DevOps. As our journey continues, we’ll unravel best practices, secure software development lifecycle (SSDLC) implementation, and the automation of security testing and vulnerability scanning. Let’s dive right in!
Understanding the Importance of Security in DevOps
In the ever-evolving landscape of software development, security plays a pivotal role. Safeguarding sensitive data, protecting systems, and preventing security breaches is paramount. Here are the best practices to adopt for a secure DevOps workflow:
Security Culture and Awareness:
1. Cultivate Security Culture: Foster a robust security culture within your organization. Educate all team members about the significance of security and their responsibilities in maintaining it.
2. Regular Security Training: Conduct routine security training and workshops to keep everyone informed about the latest security practices and threats.
3. Security-First Mindset: Encourage a security-first development mindset where security concerns are incorporated at every stage of the development process.
Infrastructure as Code (IaC) Security:
1. Version-Controlled IaC Templates: Use version-controlled IaC templates (e.g., Terraform, CloudFormation) to define infrastructure. This aids in tracking changes, reducing unauthorized modifications.
2. Secure IaC Templates: Ensure IaC templates are securely written, avoiding hardcoded secrets and adhering to best practices for resource permissions.
Access Control and Privilege Management:
1. Role-Based Access Control (RBAC): Implement RBAC to restrict resource access based on job roles, preventing unauthorized access to critical systems.
2. Regular User Permissions Review: Regularly review and audit user permissions to ensure they’re appropriate and up-to-date.
3. Multi-Factor Authentication (MFA): Enhance security with MFA to add an extra layer of protection to user accounts.
Continuous Security Monitoring:
1. Security Monitoring Tools: Utilize security monitoring tools to track system activity, network traffic, and logs for signs of anomalies or security incidents.
2. Alerts and Notifications: Set up alerts and notifications to respond swiftly to potential security breaches.
Secure Software Development Practices:
1. Secure Coding Training: Train developers in secure coding practices, emphasizing OWASP Top Ten vulnerabilities and mitigation strategies.
2. Input Validation and Output Encoding: Implement input validation to prevent web application attacks like SQL injection and XSS.
3. Dependency Updates: Regularly update dependencies and libraries to steer clear of known vulnerabilities.
Automated Security Testing:
1. CI/CD Pipeline Integration: Integrate security testing into your CI/CD pipelines for automated vulnerability detection.
2. Static Application Security Testing (SAST): Analyze source code using SAST tools like SonarQube to uncover security weaknesses.
3. Dynamic Application Security Testing (DAST): Use DAST tools like OWASP ZAP to assess application behavior during runtime and simulate real attacks.
Secure Containerization and Orchestration:
1. Trusted Container Images: If using containers, ensure images are built from trusted sources and updated with security patches.
2. Container Image Scanning: Utilize container security scanning tools to spot vulnerabilities in container images.
Regular Security Assessments and Penetration Testing:
1. Periodic Assessments: Conduct regular security assessments and penetration tests to identify vulnerabilities.
2. External Experts: Engage external security experts or ethical hackers to simulate real attacks and uncover security gaps.
Secure Data Handling:
1. Data Encryption: Encrypt sensitive data in transit and at rest to thwart unauthorized access.
2. Data Minimization: Store only necessary data to minimize the impact of potential breaches.
Incident Response and Disaster Recovery:
1. Incident Response Plan: Develop a comprehensive incident response plan to manage security incidents effectively.
2. Practice Scenarios: Regularly practice disaster recovery scenarios for a swift and efficient response to security breaches.
Implementing a Secure Software Development Lifecycle (SSDLC)
Implementing an SSDLC is pivotal for proactive security management throughout the software development process. Let’s break down the stages using a real-world example.
Example Project: Building a Web Application for Online Shopping
Stage 1: Requirements and Design
1. Identify and document security requirements specific to the web application, considering factors such as authentication, data privacy, and access controls.
2. Conduct threat modeling sessions to anticipate potential security threats and vulnerabilities.
3. Create a design that incorporates security measures, such as input validation, secure data storage, and encryption.
Stage 2: Secure Coding
1. Provide training to developers on secure coding practices, emphasizing OWASP Top Ten vulnerabilities and how to mitigate them.
2. Implement input validation to prevent common web application attacks like SQL injection and XSS.
3. Use prepared statements and parameterized queries to protect against SQL injection attacks.
Example Code (Node.js with Express and MongoDB):
// Input validation using Express-validator
const { body, validationResult } = require('express-validator');app.post('/login', [
body('username').isAlphanumeric(),
body('password').isLength({ min: 8 }),
], (req, res) => {
// Check for validation errors
const errors = validationResult(req);
if (!errors.isEmpty()) {
return res.status(400).json({ errors: errors.array() });
} // Proceed with authentication logic
});Stage 3: Continuous Integration and Security Testing
1. Integrate security testing into the continuous integration (CI) pipeline to detect security issues early.
2. Utilize Static Application Security Testing (SAST) tools to scan the application’s source code for potential vulnerabilities.
3. Use dependency scanning tools to identify and remediate vulnerabilities in third-party libraries.
Example CI Configuration (using Jenkins pipeline with OWASP ZAP):
pipeline {
  agent any
  stages {
    stage('Build') {
      steps {
        // Build the application here
      }
    }
    stage('Static Code Analysis') {
      steps {
        // Run SAST tools like SonarQube or ESLint here
      }
    }
    stage('Security Testing') {
      steps {
        // Run security tests using OWASP ZAP or similar tools
      }
    }
  }
}
Stage 4: Deployment and Configuration Management
1. Automate deployment using tools like Docker and Kubernetes to ensure consistent and secure deployments.
2. Securely manage configuration files and credentials using environment variables or secrets management tools.
Stage 5: Monitoring and Incident Response
1. Implement logging and monitoring to detect and respond to security incidents in real-time.
2. Set up alerts for unusual activities or suspicious patterns that might indicate a security breach.
Stage 6: Regular Security Assessments and Penetration Testing
1. Conduct periodic security assessments and penetration testing to identify potential weaknesses.
2. Engage external security experts to perform penetration tests and identify any security gaps.
By incorporating these SSDLC practices into the web application development process, the team can create a more secure online shopping platform that is less susceptible to security breaches. It’s important to note that security is an ongoing effort, and continuous improvement and vigilance are necessary to stay ahead of evolving threats.
Automating security testing and vulnerability scanning
Automating security testing and vulnerability scanning is a critical aspect of ensuring the security of software applications and systems. It enables organizations to detect and address potential security weaknesses and vulnerabilities early in the development process, making it more cost-effective and efficient to fix issues before they become significant problems.
Let’s explore the key aspects of automating security testing and vulnerability scanning which are described below:
Continuous Integration and Security Testing
Static Application Security Testing (SAST)
Dynamic Application Security Testing (DAST)
Dependency Scanning
Container Image Scanning
Automated Security Test Reporting
Regular Scheduled Scanning
Let’s consider a real-time example of a web application for a simple online blogging platform. We will demonstrate how to automate security testing and vulnerability scanning throughout the software development lifecycle.
Example Project: Building an Online Blogging Platform
Continuous Integration and Security Testing:
Set up a CI/CD pipeline using popular tools like Jenkins, GitLab CI, or Travis CI.
Integrate security testing into the CI/CD pipeline by adding security testing steps to the build process.
Example CI/CD Pipeline Configuration (using Jenkins):
pipeline {
  agent any
  stages {
    stage('Build') {
      steps {
        // Build the application here
      }
    }
    stage('Static Code Analysis') {
      steps {
        // Run SAST tools like SonarQube or ESLint here
      }
    }
    stage('Security Testing') {
      steps {
        // Run security tests using OWASP ZAP or similar tools
      }
    }
    stage('Deployment') {
      steps {
        // Deploy the application to the staging environment
      }
    }
    stage('DAST Testing') {
      steps {
        // Run DAST tests using OWASP ZAP or similar tools against the staging environment
      }
    }
    stage('Deploy to Production') {
      steps {
        // Deploy the application to production
      }
    }
  }
}
Static Application Security Testing (SAST):
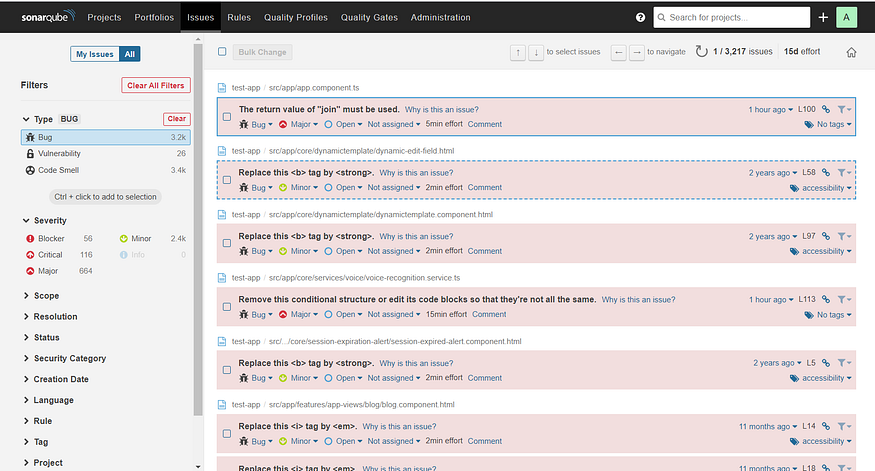
Use a SAST tool like SonarQube to analyze the application’s source code for potential security vulnerabilities and code quality issues.
The SAST tool will identify issues like SQL injection, XSS, and other security flaws.
Example SAST Report (SonarQube):
Dynamic Application Security Testing (DAST):
Employ a DAST tool like OWASP ZAP (Zed Attack Proxy) to simulate real-world attacks against the running application.
The DAST tool will analyze the application’s responses and identify vulnerabilities like security misconfigurations and authentication issues.
Example DAST Report (OWASP ZAP):

Dependency Scanning:
Use a dependency scanning tool like Snyk or OWASP Dependency-Check to analyze the project’s dependencies for known vulnerabilities.
The tool will notify you of any vulnerable libraries or packages used in the application.
Example Dependency Scanning Report (Snyk):

Container Image Scanning:
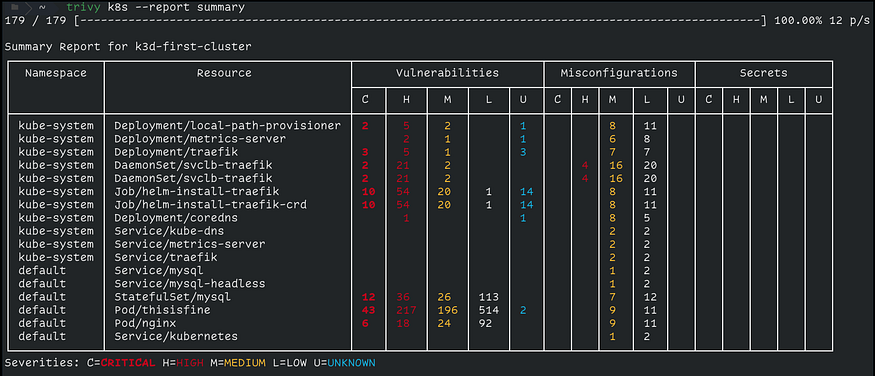
If the application is containerized, use a container image scanning tool like Clair or Trivy to analyze the container images for known vulnerabilities.
The tool will scan the layers of the container image and report any security issues found.
Example Container Image Scanning Report (Trivy):
Automated Security Test Reporting:
Set up automated security test reporting, making the reports easily accessible to the development team and stakeholders.
Reports can be sent via email or integrated into the project management tool.
By automating security testing and vulnerability scanning, development teams can identify and remediate potential security issues earlier in the development process, reducing the risk of security breaches and improving the overall security of the software application.
Conclusion
In this journey from DevOps beginners to heroes, we’ve unlocked the realm of security within the DevOps landscape. By embracing best practices, implementing a secure software development lifecycle, and automating security testing, you can build a robust and secure DevOps environment. Remember, security is not a destination but an ongoing commitment. Stay tuned for our next installment on Performance Testing and Optimization!
I hope this article provides valuable insights into the world of DevOps security. If you have any questions or want to explore further, feel free to leave a comment below. Happy DevOps-ing!
Follow me on LinkedIn https://www.linkedin.com/in/sreekanththummala/


