🚀DevOps Zero to Hero — 💡Day 2: Version Control Systems — VCS
Mastering Version Control Systems with Git: A Comprehensive Guide
Welcome to Day 2 of our 30-day DevOps course! Today, we’re diving deep into the realm of Version Control Systems (VCS), with a spotlight on the powerful tool that is Git.
Introduction:
Git, a distributed VCS, has solidified its position as the industry standard for source code management and team collaboration. In this blog post, we’ll uncover the significance of Git in the DevOps landscape, learn how to initiate a Git repository, and unravel effective branching strategies and best practices. Let’s embark on this journey!
What’s a Version Control System? Imagine you’re working on a big puzzle with a team. Everyone has their own puzzle pieces, and you want to make sure that when you put all the pieces together, they fit perfectly. A Version Control System (VCS) is like a super helpful tool that helps teams work together on big projects, just like that puzzle.
Meet Git: Your Teamwork Buddy Think of Git as a super-smart friend who keeps track of all the changes you make to your project. It’s like having a magic time-traveling notebook that remembers every version of your work. Git is really good at helping people work together on projects, especially in the world of DevOps.
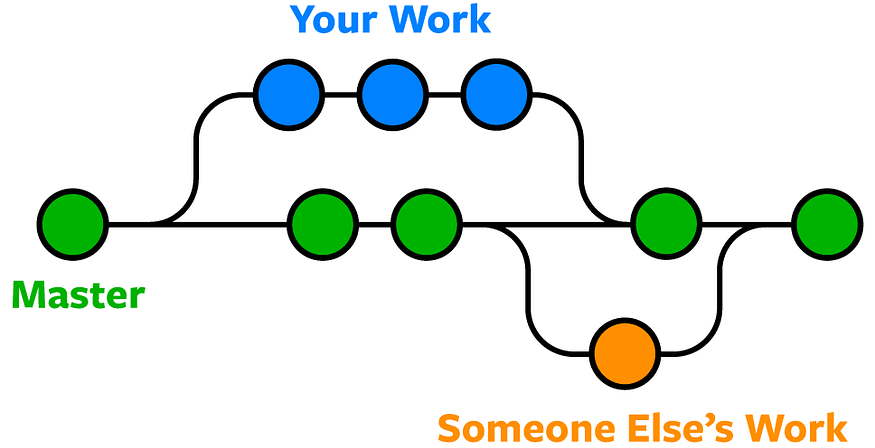
Why Do We Need Git? Imagine you and your friends are building a sandcastle on the beach. You each have your own bucket of sand to make different parts of the castle. Without Git, it might get confusing because you’re all working separately and it’s hard to know what each person did. But with Git, you can each work in your own area (called a “branch”), and when you’re ready, you can put all the parts together into the main sandcastle.
Why Git is Indispensable in DevOps:
In the realm of DevOps, streamlined collaboration, continuous integration, and seamless deployments reign supreme. Git plays an indispensable role in realizing these aspirations. To illustrate this point, consider a group of developers working on a web application. Each developer shoulders a different feature’s implementation. In the absence of Git, managing code modifications and ensuring everyone’s alignment with the latest version turns into a logistical nightmare. But with Git, developers can operate within separate branches for distinct features or bug fixes. They’re free to commit changes autonomously, participate in collaborative code reviews, and eventually integrate their branches back into the main branch when features are polished. Git’s version control prowess guarantees a comprehensive history of changes, simplifying bug tracking and enabling easy rollbacks if the need arises.
Creating a Git Repository and Navigating Branches:
To embark on your Git journey, the establishment of a Git repository is paramount. Below is a step-by-step guide on setting up a repository:
Example 1: Creating a Git Repository
Let’s say you’re starting a new web development project and want to set up a Git repository to manage your code.
Open your terminal or command prompt and navigate to the project directory.
cd /path/to/project-directoryInitialize a new Git repository using the git init command.
git initAdd your project files to the repository. Assuming you have an file1 file and a file2 file, you can use the following commands:
git add file1
git add file2
Commit the changes with a descriptive message.
git commit -m "Initial commit"Congratulations! You have successfully created a Git repository for your project.
Example 2: Managing Branches
Let’s explore an example where you’re working on a feature branch and need to manage branches effectively.
Create a new branch for your feature using the git branch command. Let’s call it feature/login.
git branch feature/loginSwitch to the newly created branch using the git checkout command.
git checkout feature/loginStart working on your feature, making changes and committing them as needed.
git add .
git commit -m "Implemented login functionality"
Meanwhile, another team member is working on a different feature. They create and switch to their branch using the following commands:
git branch feature/shopping-cart
git checkout feature/shopping-cart
They make changes and commit them to their branch.
git add .
git commit -m "Added shopping cart functionality"
Once your feature is complete and tested, you can merge it back into the main branch (e.g., main or master) using the git merge command.
git checkout main
git merge feature/login
The same applies to the other team member who wants to merge their feature branch into the main branch.
git checkout main
git merge feature/shopping-cart
By effectively managing branches, you can work on different features simultaneously without conflicts and easily integrate them back into the main branch when they are ready.
Remember to adapt these examples based on your specific project structure and branch naming conventions.
Understanding Branching Strategies:
Branching strategies define how development work is organized within a Git repository. Let’s explore a few common branching strategies with real-time examples:
Feature Branching Strategy:
Feature branching involves creating a separate branch for each new feature or enhancement. Developers work on their features independently, commit changes to their respective branches, and merge them back into the main branch when ready. This strategy allows for parallel development, easy feature isolation, and effective collaboration.
Let’s illustrate with an example:
Imagine a project where you’re developing a content management system (CMS) with multiple features. Each developer works on a specific feature branch. Here’s how the feature branching strategy could be implemented:
Developer A is assigned to work on the user authentication feature. They create a new branch for the feature:
git branch feature/user-authentication
git checkout feature/user-authentication
Developer A implements the user authentication functionality, commits the changes to the feature branch, and pushes it to the remote repository:
git add .
git commit -m "Implemented user authentication"
git push origin feature/user-authentication
Developer B is assigned to work on the content creation feature. They create a new branch for the feature and switch to it:
git branch feature/content-creation
git checkout feature/content-creation
Developer B implements the content creation functionality, commits the changes to the feature branch, and pushes it to the remote repository:
git add .
git commit -m "Implemented content creation"
git push origin feature/content-creation
Once both features are completed and tested, they are merged back into the main branch:
git checkout main
git merge feature/user-authentication
git merge feature/content-creation
GitFlow Branching Strategy:
GitFlow is a branching model that defines specific branch structures and workflows. It distinguishes between long-lived branches like develop for ongoing development and master for production-ready releases. It also incorporates short-lived feature branches for individual features or bug fixes. By following GitFlow, the team ensures a structured and controlled workflow, enabling concurrent development, clear release management, and easier bug fixing.
Let’s illustrate with an example:
In a project following GitFlow, the branches and their purposes would typically be as follows:
1. master branch: Represents the main branch where production-ready code resides. It stores stable releases.
2. develop branch: Serves as an integration branch for ongoing development work. Developers create feature branches from this branch.
3. feature branches: Created from the develop branch for specific features or enhancements. Each developer works on their feature branch and merges it back into develop once completed.
4. release branches: Created from the develop branch when preparing for a production release. It undergoes final testing and bug fixing before merging into both develop and master.
5. hotfix branches: Created from the master branch to address critical bugs or issues in production code. Once fixed, it’s merged back into develop and master.
Release Branching Strategy:
Release branching is useful when you have a stable version of your software that requires maintenance and bug fixes while you continue developing new features. It involves creating a separate branch for each release. This strategy allows you to isolate release-related activities and continue development on the main branch.
Here’s an example:
In a project utilizing the release branching strategy:
Once the development work is completed for a specific release, a new release branch is created from the develop branch:
git branch release/1.0.0
git checkout release/1.0.0
The release branch undergoes testing, bug fixing, and final preparations for deployment.
Meanwhile, developers continue working on the main branch (develop) to develop new features.
Once the release is ready, it is merged back into both the develop and master branches:
git checkout develop
git merge release/1.0.0
git checkout master
git merge release/1.0.0Any necessary hotfixes for the released version can be made on the release/1.0.0 branch and then merged back into develop and master.
Trunk-Based Development:
Trunk-based development is a branching strategy where most, if not all, development occurs directly on the main branch (often called the “trunk”). Feature branches are avoided or kept short-lived. This strategy emphasizes small, frequent commits and continuous integration.
Here’s an example:
1. Developers work directly on the main branch (master or main) for their feature development, bug fixes, and enhancements.
2. They frequently commit their changes, ensuring that each commit represents a small, incremental improvement.
3. Continuous integration and automated tests are set up to validate each commit and detect issues early.
4. Code reviews are conducted to ensure code quality, maintainability, and adherence to coding standards.
5. The deployment process is automated, allowing for frequent releases and faster feedback loops.
Trunk-based development promotes collaboration, reduces context switching, and encourages developers to integrate their changes continuously.
These examples provide a glimpse into how branching strategies can be implemented in real-time scenarios. Remember to adapt them based on your project’s needs and naming conventions.
Understanding and choosing the right branching strategy can greatly enhance collaboration and streamline development workflows within a team.
You can see more branching strategies explained in detailed here
Real-time Interview Questions:
Here are some interview questions related to Version Control Systems (VCS), Git, and branching strategies:
Version Control Systems (VCS) and Git:
- What is version control, and why is it important in software development?
- Explain the difference between centralized version control and distributed version control systems.
- What are the advantages of using Git over other version control systems?
- Describe the basic architecture of Git.
- What is a repository in Git, and what components does it consist of?
- Explain the terms “commit,” “branch,” and “merge” in the context of Git.
- How does Git handle conflicts, and what is the purpose of a merge conflict?
- What is a Git submodule, and how is it different from a regular directory?
- How would you revert a commit in Git while preserving the commit history?
- What is the purpose of Git’s “stash” feature, and when would you use it?
Branching Strategies:
- What is a branching strategy, and why is it important in collaborative software development?
- Describe the “Feature Branch” branching strategy. What are its benefits and drawbacks?
- Explain the “Gitflow” branching strategy. How does it work, and what are its main branches?
- What is the “Trunk-Based Development” strategy, and in what scenarios is it suitable?
- Compare and contrast “Feature Toggles” with traditional branching strategies.
- What is “Continuous Integration” (CI) and how does it relate to branching strategies?
- Describe the “GitHub Flow” branching strategy. How does it differ from Gitflow?
- What challenges can arise when using a complex branching strategy, and how can they be mitigated?
- In a team where multiple developers work on a feature simultaneously, how can you prevent conflicts and integration issues?
- When would you choose a fast-paced branching strategy like “Trunk-Based Development,” and when would you opt for a more structured strategy like “Gitflow”?
Remember, it’s not just about knowing the answers to these questions, but also being able to explain your reasoning and provide practical examples from your experience. Good luck with your interview preparation!
Conclusion:
Version Control Systems are like the foundation of modern software work. Among them, Git is like the leader in managing code and helping teams work together. In our journey, we’ve discovered how important Git is in the world of DevOps. We’ve also learned how to create Git repositories and explored different ways to organize our work using branches.
And so, the second day of our 30-day DevOps journey comes to an end. Get ready for the next part, where we’ll focus on Continuous Integration, a really important part of DevOps. If you have any questions, feel free to ask in the comments. Until next time, enjoy coding!
Please Like, Share and Follow me if you like this 🙏
🚀DevOps-Zero to Hero💡 Day 1: Introduction to DevOps
Hello and welcome to our month-long exploration into the world of DevOps! Over the next 30 days, we’re going to take a deep dive into DevOps, which is all about making teamwork between software developers and IT operations smoother. We’ll talk about its main ideas, goals, how people work together, using cool automation, and all the good things it brings to companies. Whether you’re someone who writes code, works in IT, or just likes learning new things, this course is going to teach you everything you need to know to use DevOps well.
Starting Strong: What DevOps Is All About
To kick things off, let’s start with the basics of DevOps. DevOps is a way of working that brings together software development — Dev (the people who make the programs) and IT operations — Ops (the people who keep everything running) to work better together. This helps make sure software gets made and delivered smoothly.
Getting to Know DevOps:
Breaking Down Walls: DevOps wants to break down the walls that sometimes separate developers and IT folks. When they talk more and work together, things get done better.
Always Building and Delivering: DevOps wants to make sure that software gets built, tested, and sent out often and automatically. This helps companies put out new stuff quickly and be flexible.
Thinking of Computers as Code: DevOps treats all the stuff that makes computers work (like setting them up and making them talk to each other) as if it were lines of code in a program. This makes things work smoothly and quickly.
Getting Friendly with DevOps Culture, Teamwork, and Automation:
Being Friends at Work: DevOps is also about getting along and working together in a good way. People who make software and those who make it work need to team up. This makes sure that everyone is on the same page, and things go smoothly.
Working Together: DevOps says that different groups of people should work together, like software people and IT folks. This helps to put code (the stuff that makes programs) into action in a smooth and quick way.
Letting Computers Do the Boring Stuff: Another big thing is letting computers do the boring and repetitive jobs. This saves time, stops mistakes, and lets everyone do more important things. For instance, setting up, testing, and delivering software can happen without people having to do everything manually.
Uncovering the Good Stuff: Why DevOps Is Awesome
Using DevOps has lots of great benefits for companies. Let’s check them out:
Getting Faster: With DevOps, things happen quickly. Developers and IT teams work together well, so new software can get out there faster. This helps companies keep up with what customers want and stay competitive.
Better Friends at Work: DevOps makes sure that everyone talks and gets along. This means fewer misunderstandings and better teamwork.
Stronger Software: DevOps uses automation and keeps a close eye on things. This helps catch problems early on, so software is better and more stable.
Getting More Done: Since boring tasks are automated, people can focus on important work. This makes everything work better and faster.
Wrapping Up Day 1: What’s Next?
We’ve learned a bunch about DevOps principles, goals, teamwork, and the magic of automation. Plus, we’ve seen how it helps companies in cool ways from the start. Tomorrow, we’re diving into Version Control Systems (VCS). So, remember to come back for Day 2 and keep learning with us!
Questions for the Curious Minds: Interview Edition
To challenge your brain and help you get ready for interviews, here are some interesting questions inspired by what we’ve covered:
- What is DevOps, and why is it important in modern software development?
- How can people from different teams work better together in a DevOps setup?
- What is the “DevOps culture,” and why is it considered crucial for successful DevOps implementation?
- Can you provide an example of a process or task that you automated in a previous project to improve efficiency?
- How do you know if a DevOps plan is working well and the software is good quality?
- How do you keep making things even better in a DevOps way?
- What would you do to make a company change the way they work to use DevOps?
Stay tuned for Day 2, where we’ll explore Version Control Systems (VCS)!
I hope you enjoyed this easy-to-follow read. Don’t forget to check in tomorrow for the next chapter in our 30-day DevOps adventure. Happy learning!
Please Like, Share & Follow if you like this post.
🚀 Kyverno: A Comprehensive Guide to Kubernetes Policy Management🔐
Introduction
As Kubernetes gains popularity as a container orchestration platform, managing configurations and enforcing best practices can become challenging. This is where Kyverno comes into play. Kyverno, Greek for “govern,” is a powerful policy engine designed specifically for Kubernetes. In this article, we will explore Kyverno and its essential features, understand how it works, and create our first policy through a Quick Start guide.
About Kyverno
Kyverno offers a multitude of features that make it a versatile and user-friendly policy engine for Kubernetes:
1. Policies as Kubernetes Resources: Kyverno leverages Kubernetes resources itself, eliminating the need to learn a new policy-specific language.
2. Validate, Mutate, Generate, or Cleanup: It can validate, mutate, generate, or cleanup Kubernetes resources during admission control.
3. Verify Container Images: Kyverno supports software supply chain security by inspecting container image metadata.
4. Match Resources Using Label Selectors and Wildcards: Policies can be written to target specific resources using labels and wildcards.
5. Validate and Mutate Using Overlays: Kyverno supports overlay-style syntax similar to Kustomize for validation and mutation.
6. Synchronize Configurations Across Namespaces: Kyverno enables syncing configurations across different namespaces.
7. Block Non-Conformant Resources: It can block non-conformant resources using admission controls or report policy violations.
8. Self-Service Reports and Policy Exceptions: Kyverno provides self-service reports and policy exceptions for better visibility and management.
9. Test Policies and Validate Resources: The Kyverno CLI allows testing policies and validating resources in CI/CD pipelines before applying them to the cluster.
10. Manage Policies as Code: Policies can be managed as code using familiar tools like Git and Kustomize, simplifying version control and collaboration.
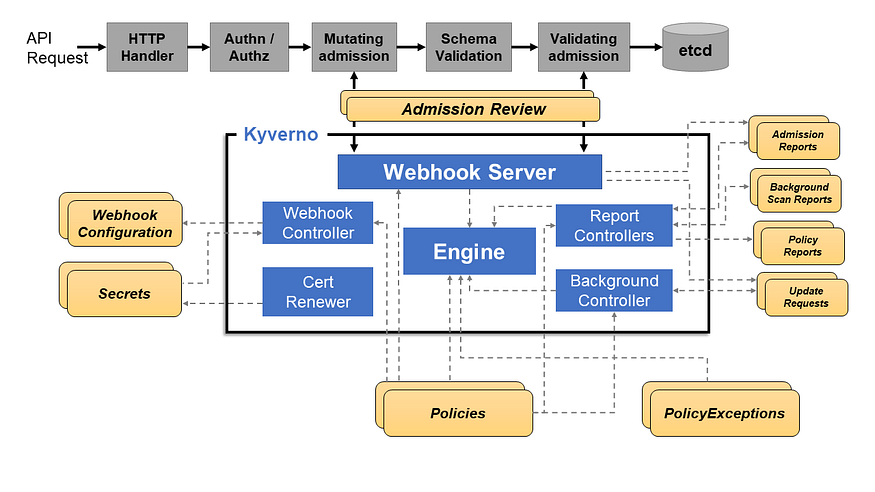
How Kyverno Works
Kyverno functions as a dynamic admission controller within a Kubernetes cluster. It receives validating and mutating admission webhook callbacks from the Kubernetes API server and applies matching policies to enforce admission policies or reject requests.
Kyverno policies can match resources based on their kind, name, label selectors, and more. Mutating policies can be written as overlays or RFC 6902 JSON Patches. Validating policies use an overlay-style syntax with support for pattern matching and conditional processing.
Policy enforcement is captured using Kubernetes events, and Kyverno creates Policy Reports in the cluster to show the results of policy decisions upon allowed resources.
Quick Start
This Quick Start guide provide step-by-step instructions to get Kyverno up and running and demonstrate some of its essential features. These guides focus on validation, mutation, and generation policies. However, they are intended for proof-of-concept or lab demonstrations and not recommended for production.
First, install Kyverno from the latest release manifest.
kubectl create -f https://github.com/kyverno/kyverno/releases/download/v1.10.0/install.yamlNext, select the quick start guide in which you are interested. Alternatively, start at the top and work your way down from here.
- Validation: The validation guide demonstrates how to create a simple Kyverno policy that ensures a specific label is present on every Pod. It shows how validation policies function as “yes” or “no” decision-making processes, allowing compliant resources to pass and blocking non-compliant ones.
2. Mutation: The mutation guide showcases Kyverno’s ability to change or “mutate” a resource before it is admitted into the cluster. It demonstrates how to create a policy that adds a label to new Pods only if the label is not already assigned.
3. Generation: The generation guide highlights Kyverno’s powerful ability to generate new Kubernetes resources based on policy definitions. It shows how to create a policy that synchronizes a Secret from one Namespace to a newly created Namespace.
Conclusion
Kyverno is a robust and user-friendly policy engine designed to ease Kubernetes configuration management and enforce best practices. With its ability to validate, mutate, generate, and cleanup resources, Kyverno empowers cluster administrators to maintain configuration consistency and security.
As you delve deeper into Kyverno, you’ll discover its potential for automating and optimizing various Kubernetes operations. However, when deploying Kyverno in production, refer to the official installation page for comprehensive guidance.
In conclusion, Kyverno is a valuable addition to any Kubernetes environment, providing the means to govern and streamline configurations efficiently. So, why not give it a try and experience the power of policy management in Kubernetes with Kyverno? Happy Kuberneting!


