Securing microservices with Istio on Kubernetes


Microservices are a popular architecture choice for building modern, scalable applications. However, as applications become more distributed and complex, security becomes a larger concern. In this article, we will explore how Istio, an open-source service mesh, can be used to secure microservices running on Kubernetes.
What is Istio?
Istio is an open-source service mesh that provides a number of capabilities for securing, controlling, and observing microservices. It consists of a number of components, including:
- Envoy: A high-performance, open-source edge and service proxy that runs alongside each service in a microservices environment.
- Mixer: A policy and telemetry hub that enforces access controls and gathers telemetry data from Envoy proxies.
- Pilot: A traffic management hub that provides traffic routing, resiliency, and observability features.
How Istio Secures Microservices
Istio provides a number of features for securing microservices, including:
- Mutual TLS: Istio can be configured to enforce mutual TLS (mTLS) between all services in the mesh. This ensures that all communication between services is encrypted and authenticated.
- Access control: Istio's Mixer component can be used to enforce fine-grained access controls on service requests. For example, it can be used to block requests from certain IP addresses or to require certain headers to be present in requests.
- Rate limiting: Istio can be configured to rate limit requests to certain services in order to prevent abuse or denial of service attacks.
How to Install Istio on Kubernetes
Installing Istio on Kubernetes is relatively straightforward. The first step is to download and extract the Istio package:
curl -L https://istio.io/downloadIstio | sh -
cd istio-*
Next, we need to add the Istio executables to our PATH:
export PATH=$PWD/bin:$PATH
Now we can use the istioctl tool to install Istio into our Kubernetes cluster. We will use the default, non-mutual TLS configuration:
istioctl install --set profile=default
This will create a number of resources in our Kubernetes cluster, including Deployments, Services, and ConfigMaps.
Conclusion
Istio is a powerful tool for securing microservices running on Kubernetes. Its features, such as mutual TLS and access control, make it easy to secure communication between services and protect against attacks. By installing Istio on your Kubernetes cluster, you can gain a higher level of security and visibility into your microservices environment.
Physical servers vs Virtual machines vs Docker containers

Physical servers :
Physical servers are traditional hardware-based servers that are installed in a datacenter or on-premises. These servers are dedicated to a single purpose, and all of their resources (such as CPU, RAM, and storage) are dedicated solely to that purpose. Some benefits of physical servers include:
- High performance: Since they are dedicated resources, physical servers can offer a higher level of performance than other options.
- Reliability: Physical servers are less likely to experience issues due to resource contention or other factors that can affect virtual environments.
However, physical servers also come with some drawbacks, including:
- Cost: Physical servers are more expensive to maintain, as they require physical space, power, and cooling.
- Inflexibility: Physical servers are dedicated to a single purpose, so it is not easy to change their use or reconfigure them.
Virtual machines, on the other hand, allow multiple operating systems to run on a single physical server. Each virtual machine acts as a separate entity, with its own operating system and resources, but it shares the resources of the physical server with other virtual machines. Some benefits of virtual machines include:
- Resource utilization: Virtual machines allow organizations to get more value out of their hardware by running multiple applications on a single server.
- Isolation: Virtual machines offer a good level of isolation, as each instance runs its own operating system.
However, virtual machines also come with some drawbacks, including:
- Resource intensity: Virtual machines can still be resource-intensive, and they may not offer the same level of performance as a dedicated physical server.
- Complexity: Virtual machines require more setup and configuration than other options, such as Docker containers.
Docker containers are a newer option that has gained popularity in recent years. Unlike virtual machines, which require a separate operating system for each instance, containers share the host operating system and use fewer resources. Some benefits of Docker containers include:
- Lightweight: Containers are more lightweight than virtual machines, as they do not require a separate operating system for each instance.
- Portability: Containers are more portable than virtual machines, as they can be easily moved from one host to another without the need to reconfigure the operating system.
However, Docker containers also have some drawbacks, including:
- Isolation: Containers do not offer the same level of isolation as virtual machines, which can be a concern for organizations with strict security requirements.
- Compatibility: Not all applications can be run in a containerized environment, so it is important to consider compatibility when choosing this option.
Ultimately, the choice between physical servers, virtual machines, and Docker containers will depend on your specific needs and resources. Physical servers offer the highest level of performance but are more expensive to maintain, while virtual machines offer a good balance of performance and cost. Docker containers are the most lightweight option but may not offer the same level of isolation as virtual machines.
Infrastructure as a code best practices : Terraform
In this post we will go over what a typical infrastructure would look like for an enterprise product and the best practices for the same.
1. High level infrastructure overview :
A typical infrastructure of a product can be categorized into the following three categories :
- Global infra : This infrastructure contains the components which acts as the foundation of the overall infra across the product. The infra at this layer should mostly consist of setting up the networking — vpc ,subnets ,acl etc , dns and so on.
- Common Infra : This layer consists of the infra which is needed by more than one service. Examples would be Redis Cluster , EKS Cluster etc.
- Service Infra : This layer consists of infra which is service specific and should reside alongside the code repository of the service itself. Example: rds for a service would reside alongside the code of the service.
2. Consistent code structure :
All the terraform code written should follow a consistent code structure. Below can be an example :


- modules : This folder should contain terraform code for resource creation . Examples : vpc,rds,subnets etc. Creating modules promotes reusability, hence reducing code duplication. Also each of the sub-folders/resources in modules should contain a structure like : main.tf , variables.tf , output.tf
- policy : This folder should contain policy documents such as IAM role policies as json files .So this folder should act as a collection of policies which would be used by the modules folder. Examples : rds_iam_role_polcy.json , etc.
- scripts : The folder should contain any scripts such as shells scripts or python scripts used for any resource handling or creation . Hence it acts a common place of any kind of script we write for our infra.
- templates : In terraform we can use “.tpl” files for various purpose , in such a case we can keep those files in this folder for clarity.
- main.tf : This file acts the entry point when we call terraform commands like init, validate , plan ,deploy and destroy.
- output.tf : The outputs which need to be written to the state should be present here.
- variables.tf : The variables used should be present in this file.
- {env}-{region}.tfvars : Examples of such files are :
For dev and region — eu-central-1 , the expected file name should be : dev-eu-central-1.tfvars .
For int and region — eu-central-1 , the expected file name should be : int-eu-central-1.tfvars and so on.
The files contain initialized values for the variables declared in variables.tf file.
3. Use terraform modules :
Use of terraform modules wherever possible should be done and such modules should be kept in a common place in gitlab/code repository . Whenever we need a new resource for a service, a repo for such a resource should be created containing the terraform code. Such modules can then be directly referred by the service infra code . In case another service needs the same resource in future , we don’t need to duplicate the terraform code and can use the tried and tested version present .
4. Consistent Naming convention :
Terraform recommends the following naming conventions :
- General : Use
_(underscore) instead of-(dash) in all: resource names, data source names, variable names, outputs. Only use lowercase letters and numbers. - Resources : Do not repeat resource type in resource name (not partially, nor completely):
Good: resource "aws_route_table" "public" {}
Bad: resource "aws_route_table" "public_route_table" {}
Bad: resource "aws_route_table" "public_aws_route_table" {}
Use “-" inside arguments values and in places where value will be exposed to a human (eg, inside DNS name of RDS instance).
use “count” as the first argument in a resource
use “tag” as the last argument followed by “depends” and “lifecycle” .
- Variables : Use plural form in name of variables of type list and map. When defining variables order the keys as : description , type, default . Always include description for all variables even if you think it is obvious.
- outputs.tf : The general recommendation for the names of outputs is that it should be descriptive for the value it contains and be less free-form than you would normally want. If the returned value is a list it should have plural name. Always include
descriptionfor all outputs even if you think it is obvious.
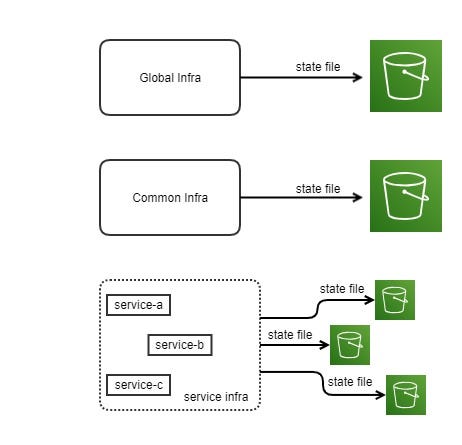
5. Organizing state file :
The state should be stored remotely in an s3 bucket and each of the infra layers : Global, Common and Service should have their own state file. Further more , each of the services in the service layer should have their own state file as well. Organizing state files like this ensure loose coupling. Each service per env should have its own state file . Following shows how the state file should be organized.

6. Use an automated testing framework to write unit and functional tests that validate your terraform modules :
Automated testing is every bit as important for writing infrastructure code as it is for writing application code. Example of such a framework is terratest.
7. Infrastructure service names :
A typical infrastructure created using terraform can follow the below naming style for consistency purpose :
For a single resource :
infra_name = ${name}-${resource_type}
name = ${env}-${service_name}
Examples :
env = dev , service_name = customer-svc , resource_type = db-cluster
rds_cluster_name : dev-customer-svc-db-cluster
For multiple instance of a resource :
infra_name = ${name}-${resource_type}-${count.index}
name = ${env}-${service_name}
Examples :
env = dev , service_name = customer-svc , resource_type = db-cluster-instance , count.index = 0
rds_instance_name : dev-customer-svc-db-cluster-instance-0
env = dev , service_name = customer-svc , resource_type = db-cluster-instance , count.index = 1
rds_instance_name : dev-customer-svc-db-cluster-instance-1
The reasons for the variables used are :
env : we want env to be a part of the infra name so that we can use a single account for creating multiple envs. i.e in case we want to have dev and test env resources within a single aws account the value of this variable we help us distinguish the resources of different env.
service_name : we want the service which owns the resource in the infra name because it becomes easier to search/find resource by service names when there are lot of similar resources . For example if we have lots of queues in our account and if we want to look for a particular queue and we know the service which owns the queue we can search that queue by just typing the service name.
8. Tags :
Tagging the resources is an important part of infra creation in cloud. A resource which supports tagging can have the following set of tags :
Name = “The actual resource name . This should be the ${infra_name} stated above. The key “Name” is case sensitive. In some of the resources this will help to give the resource a name in the aws console . Example in case of subnets or security groups.”
environment = “The env like : dev , int, prod. Useful in case we have multiple env in one account.”
owner-service = “The service which uses this resource and is the owner of the resource. Useful to list resources used by a particular service.”
infra-region = “The region of the resource.”
team-name = “ The team name who is the owner for the resource.”
time-zone = “ The primary time of the operating resource.”
start-time = “The start time of the resource.”
stop-time = “The stop time of the resource. The start and stop times helps a scheduler script know when to start and stop a resource.”
contact = “The team email to contact in case of any queries related to the resource.”
These key-value pairs can be utilized for billing, ownership, automation, access control, and many other use cases.


