API Design - Basics & Best practices
Introduction
Application Programming Interfaces (APIs) are the backbone of modern software development. They enable diverse applications to communicate and share data seamlessly, making it possible to integrate different systems and services effectively. Whether you’re building a simple API for a personal project or a complex one for a large-scale enterprise application, following good API design principles is crucial for creating robust, scalable, and user-friendly interfaces.
In this comprehensive guide, we will walk you through the fundamentals of API design, progressing from the basics to advanced best practices. By the end of this blog, you will have a solid understanding of how to design APIs that are efficient, secure, and easy to use.
Understanding APIs
What is an API?
An API (Application Programming Interface) is a set of rules and protocols for building and interacting with software applications. It defines the methods and data formats that applications use to communicate with external systems or services. APIs enable different software components to interact with each other, allowing developers to use functionalities of other applications without needing to understand their internal workings.
Types of APIs
- REST (Representational State Transfer):
- Uses standard HTTP methods.
- Stateless architecture.
- Resources identified by URLs.
- Widely used due to simplicity and scalability.
2. SOAP (Simple Object Access Protocol):
- Protocol for exchanging structured information.
- Relies on XML.
- Supports complex operations and higher security.
- Used in enterprise-level applications.
3. GraphQL:
- Allows clients to request exactly the data they need.
- Reduces over-fetching and under-fetching of data.
- Supports more flexible queries compared to REST.
4. gRPC:
- Uses HTTP/2 for transport and protocol buffers for data serialization.
- Supports bi-directional streaming.
- High performance and suitable for microservices.
Basic Principles of API Design
1. Consistency
Consistency is key to a well-designed API. Ensure that your API is consistent in its structure, naming conventions, and error handling. For instance:
- Use similar naming conventions for endpoints.
- Apply uniform formats for responses and errors.
- Standardize parameter names and data types.
2. Statelessness
Design your API to be stateless. Each request from a client should contain all the information needed to process the request. This simplifies the server’s design and improves scalability. Statelessness means that the server does not store any client context between requests, which helps in distributing the load across multiple servers.
3. Resource-Oriented Design
Treat everything in your API as a resource. Resources can be objects, data, or services, and each should have a unique identifier (typically a URL in RESTful APIs). Design endpoints to represent resources and use HTTP methods to perform actions on them.
4. Use Standard HTTP Methods
Follow the HTTP methods convention to perform operations on resources:
GETfor retrieving resources.POSTfor creating resources.PUTfor updating resources.DELETEfor deleting resources. Using these standard methods makes your API intuitive and easier to use.
5. Versioning
Include versioning in your API design to handle updates without breaking existing clients. Common versioning strategies include:
- URL versioning (
/v1/resource). - Header versioning (
Accept: application/vnd.yourapi.v1+json). - Parameter versioning (
/resource?version=1).
Designing a Simple RESTful API
Step 1: Define the Resources
Identify the resources your API will expose. For a simple blog API, resources might include posts, comments, and users.
Step 2: Design the Endpoints
Map out the endpoints for each resource. For example:
GET /posts- Retrieve all posts.GET /posts/{id}- Retrieve a specific post.POST /posts- Create a new post.PUT /posts/{id}- Update a specific post.DELETE /posts/{id}- Delete a specific post.
Step 3: Define the Data Models
Specify the data structure for each resource. For instance, a post might have:
{
  "id": 1,
  "title": "API Design",
  "content": "Content of the post",
  "author": "John Doe",
  "created_at": "2024-06-03T12:00:00Z"
}
Step 4: Implement the Endpoints
Use a framework like Express (Node.js), Django (Python), or Spring Boot (Java) to implement the endpoints. Ensure each endpoint performs the intended operation and returns the appropriate HTTP status codes. For example, a GET /posts endpoint might look like this in Express.js:
app.get('/posts', (req, res) => {
  // Logic to retrieve all posts from the database
  res.status(200).json(posts);
});
Advanced Best Practices
1. Authentication and Authorization
Secure your API using authentication (who you are) and authorization (what you can do). Common methods include:
- OAuth: A widely used open standard for access delegation, commonly used for token-based authentication.
- JWT (JSON Web Tokens): Tokens that encode a payload with a signature to ensure data integrity.
- API Keys: Simple tokens passed via HTTP headers or query parameters to authenticate requests.
2. Rate Limiting
Implement rate limiting to prevent abuse and ensure fair usage of your API. This can be done using API gateways or middleware. Rate limiting helps protect your API from excessive use and ensures resources are available for all users.
3. Error Handling
Provide clear and consistent error messages. Use standard HTTP status codes and include meaningful error messages and codes in the response body. For example:
{
  "error": {
    "code": 404,
    "message": "Resource not found"
  }
}
Common HTTP status codes include:
200 OKfor successful requests.201 Createdfor successful resource creation.400 Bad Requestfor client-side errors.401 Unauthorizedfor authentication errors.403 Forbiddenfor authorization errors.404 Not Foundfor non-existent resources.500 Internal Server Errorfor server-side errors.
4. Pagination and Filtering
For endpoints returning large datasets, implement pagination to manage the load and improve performance. Allow clients to filter and sort data as needed. For example:
- Pagination:
GET /posts?page=2&limit=10 - Filtering:
GET /posts?author=JohnDoe - Sorting:
GET /posts?sort=created_at&order=desc
5. Documentation
Comprehensive documentation is essential for any API. Use tools like Swagger (OpenAPI) or Postman to create interactive and up-to-date documentation. Good documentation should include:
- Detailed descriptions of endpoints.
- Request and response examples.
- Error messages and codes.
- Authentication methods.
- Sample code snippets.
6. Testing
Thoroughly test your API to ensure it handles various scenarios gracefully. Use unit tests, integration tests, and automated testing tools to validate functionality and performance. Popular testing frameworks include:
- JUnit for Java.
- PyTest for Python.
- Mocha for JavaScript. Automated testing can help catch issues early and ensure your API remains reliable as it evolves.
7. Monitoring and Analytics
Implement logging, monitoring, and analytics to track the usage and performance of your API. Tools like Prometheus, Grafana, and ELK Stack can help with this. Monitoring allows you to:
- Detect and respond to issues quickly.
- Analyze usage patterns.
- Improve the overall performance and reliability of your API.
Conclusion
Good API design is fundamental to building scalable, maintainable, and user-friendly applications. By following these principles and best practices, you can create APIs that are not only functional but also delightful to use. Start with the basics, focus on consistency and simplicity, and gradually incorporate advanced features as your API evolves.
Remember, the goal of a well-designed API is to make life easier for developers, enabling them to build powerful applications with minimal friction. Keep learning, iterating, and improving your API design skills. Happy coding!
Choosing the Right Git Branching Strategy: A Comparative Analysis

Effective branch management is crucial for successful collaboration and efficient development with Git. In this article, we will explore four popular branching strategies — Git-Flow, GitHub-Flow, GitLab-Flow, and Trunk Based Development. By understanding their pros, cons, and ideal use cases, you can determine the most suitable approach for your project.
1. Git-Flow:
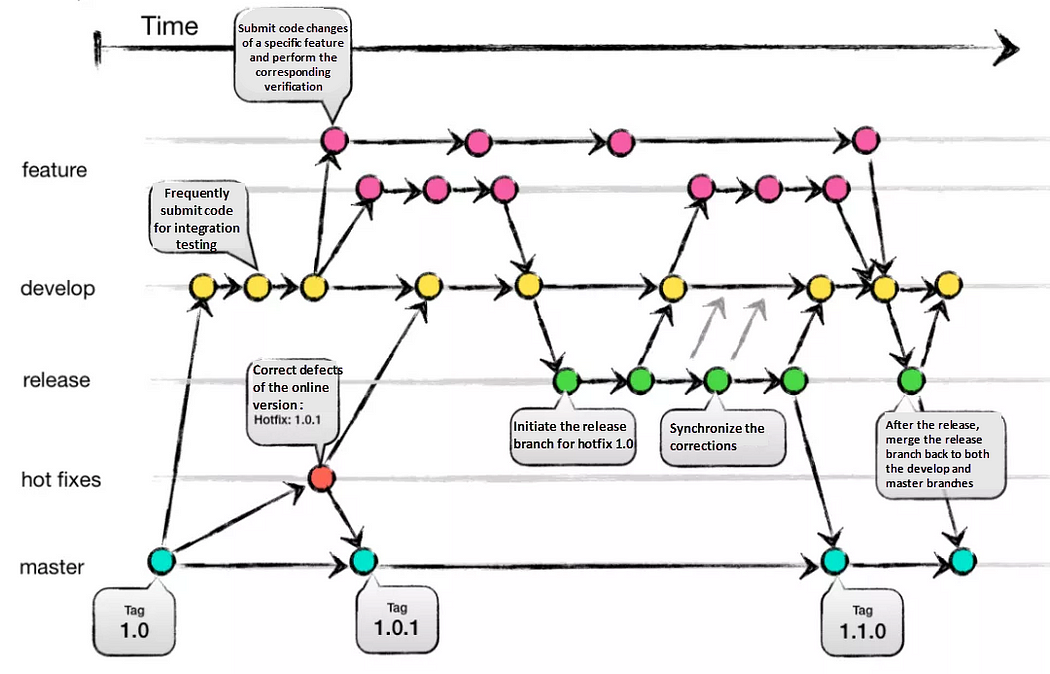
Git-Flow is a comprehensive branching strategy that aims to cover various scenarios. It defines specific branch responsibilities, such as main/master for production, develop for active development, feature for new features, release as a gatekeeper to production, and hotfix for addressing urgent issues. The life-cycle involves branching off from develop, integrating features, creating release branches for testing, merging into main/master, and tagging versions.
Pros:
- Well-suited for large teams and aligning work across multiple teams.
- Effective handling of multiple product versions.
- Clear responsibilities for each branch.
- Allows for easy navigation of production versions through tags.
Cons:
- Complexity due to numerous branches, potentially leading to merge conflicts.
- Development and release frequency may be slower due to multi-step process.
- Requires team consensus and commitment to adhere to the strategy.
2. GitHub-Flow:
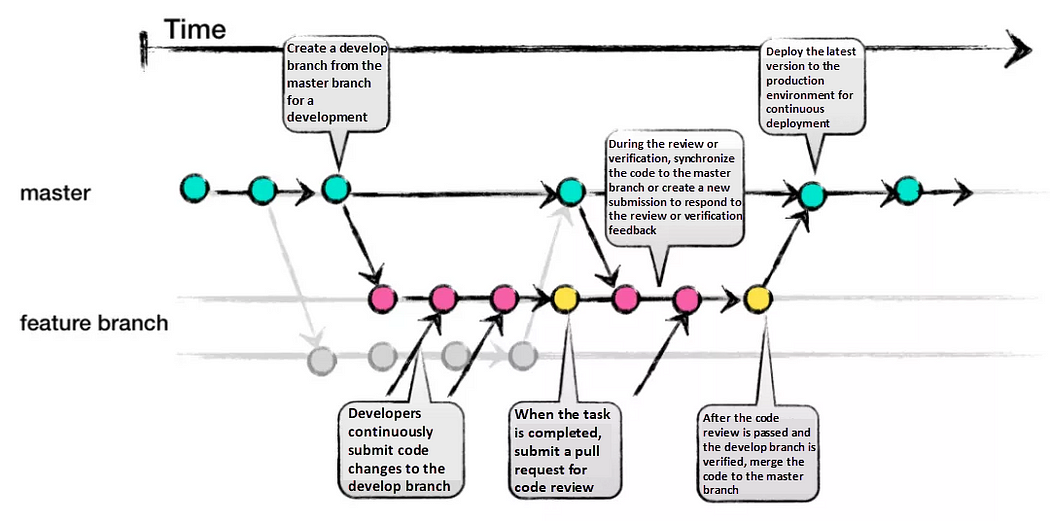
GitHub-Flow simplifies Git-Flow by eliminating release branches. It revolves around one active development branch (often main or master) that is directly deployed to production. Features and bug fixes are implemented using long-living feature branches. Feedback loops and asynchronous collaboration, common in open-source projects, are encouraged.
Pros:
- Faster feedback cycles and shorter production cycles.
- Ideal for asynchronous work in smaller teams.
- Agile and easier to comprehend compared to Git-Flow.
Cons:
- Merging a feature branch implies it is production-ready, potentially introducing bugs without proper testing and a robust CI/CD process.
- Long-living branches can complicate the process.
- Challenging to scale for larger teams due to increased merge conflicts.
- Supporting multiple release versions concurrently is difficult.
3. GitLab-Flow:
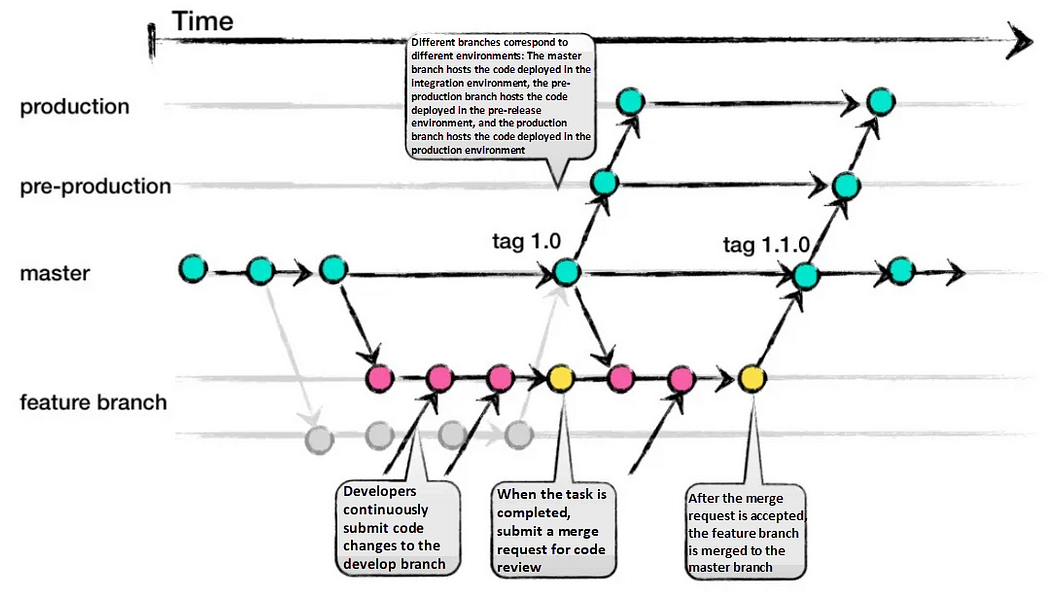
GitLab-Flow strikes a balance between Git-Flow and GitHub-Flow. It adopts GitHub-Flow’s simplicity while introducing additional branches representing staging environments before production. The main branch still represents the production environment.
Pros:
- Can handle multiple release versions or stages effectively.
- Simpler than Git-Flow.
- Focuses on quality with a lean approach.
Cons:
- Complexity increases when maintaining multiple versions.
- More intricate compared to GitHub-Flow.
4. Trunk Based Development:
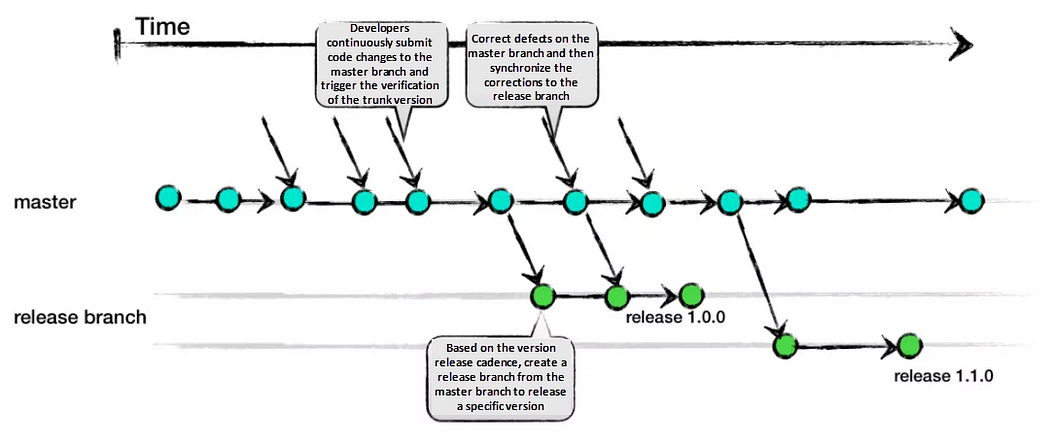
Trunk Based Development promotes a single shared branch called “trunk” and eliminates long-living branches. There are two variations based on team size: smaller teams commit directly to the trunk, while larger teams create short-lived feature branches. Frequent integration of smaller feature slices is encouraged to ensure regular merging.
Pros:
- Encourages DevOps and unit testing best practices.
- Enhances collaboration and reduces merge conflicts.
- Allows for quick releases.
Cons:
- Requires an experienced team that can slice features appropriately for regular integration.
- Relies on strong CI/CD practices to maintain stability.
Conclusion:
Each branching strategy — Git-Flow, GitHub-Flow, GitLab-Flow, and Trunk Based Development — offers its own advantages and considerations. Choosing the right strategy depends on your specific project requirements. Git-Flow suits large teams and complex projects, while GitHub-Flow excels in open-source and small team environments. GitLab-Flow provides a compromise between Git-Flow and GitHub-Flow, while Trunk Based Development is ideal for experienced teams focused on collaboration and quick releases. Select the strategy that aligns with your team’s capabilities, project complexity, and desired workflow to maximize efficiency and success.
_ Thank you for reading💚


